Showing posts with label gym. Show all posts

Tuesday, March 17, 2015

Recipe: Sprouted Moong (Green Gram) Falafels!


Wow, at the beginning of this journey with Tata Salt Lite I did not know if I would be able to stick to the schedule and be regular with my blogging. This is my last post for #slite and I'm going to miss this so much, that I have decided to stick to Tata Salt Lite from now on. Thank you so much for letting me invent and play around in my kitchen, and discover so much more about myself while doing so! Thank you for also giving me a medium to convey to the world the importance of no sodium salt!

I took few days to think about the perfect last recipe, or a grand finale, if you will. I thought of a Brown Rice Phirni, a Cauliflower soup, an epic stir fry and so many more items. But then I realised I didn't do anything with Sprouts and considering they are such an important part of my daily life, it is unfair to them. So I was brainstorming with my bestie all the way in Singapore, when she mentioned I could make Sprout Falafels. What a brilliant idea! Not to mention how utterly genius this is, it is also insanely healthy, and a good high protein alternative for people like me who get tired of eating Sprouts just as is. It all seemed like it would work out on paper, but nothing is ever sure till you actually execute it so I did a test run. I am so happy with how these turned out! You can either bake them or pan fry them in very little oil, like I did, have it with Hummus, or stuff it in your pita, roti, have it with bread, or just as is!


Sprouted Moong Falafels
Serves 2
Takes 15 minutes


Ingredients:

1 cup sprouted Moong/Green Gram. (You can use any kind of sprouts)
5 cloves of Garlic
1/2 an Onion, finely chopped.
A handful of mixed herbs, finely chopped. (I used coriander, mint, parsley)
1 tsp Roasted Cumin powder
Tata Salt Lite, to taste
1/2 tsp All spice powder (can be substituted with brown Garam Masala powder)
juice of half a lemon.
1/2 tsp Baking Soda
2 tsp Olive Oil.

Method:

You can either use lightly steamed Moong or raw Moong for this recipe as you desire. If you want to use steamed Moong, place them in the microwave, sprinkled with some water and microwave on high for a minute. You'll need to let them cool down before proceeding. I used raw sprouts.

Pulse the sprouts in the blender, in short 2 second bursts, till it resembles a coarse powder. We do not want a paste. Remove them in a mixing bowl. Add in the garlic and pulse that as well, add to the sprout mix.

Now throw in the Onion, herbs, and the powders. Add salt and mix everything together.

In a spoon, take the lemon juice and add the baking soda to it. Pour the froth into the mixture and combine everything again. Gently make bite sized rounds of falafel, and place them on a plate. I made 8. Put them in the fridge for 5 minutes.

Heat up a non stick pan on medium high with the Olive oil. Put in the falafel rounds and slightly flatten them. Let them be undisturbed for a minute. Flip them over, lower the flame to medium and finish cooking on the other side, approximately 3 to 4 minutes.

Serve hot!
Thursday, March 12, 2015

Recipe: Instant Oats Lite Dosa


The parents have been out of town for a week now. As much as I'm loving the silence, I am missing them more. Every morning I wake up early only to find that Dad has already woken up and is practising Yoga before he starts getting ready to go to work. When I'm back from the gym, while Dad has already left for work, Mom is warming breakfast up in the kitchen with the TV blasting in full volume in the hall, just so she can hear the dialogues. If it's a Sunday I'd wake up at the same time (I go to the gym on Sunday's, it's empty and you can really get a good workout done) but everyone's asleep. When I return, TV is blaring full volume and Mom is in the kitchen, fixing breakfast. Sunday breakfasts are staple - either it's Idli or Dosa. Followed by Chicken or Mutton curry for lunch, where I'd make more Dosas and eat with the curry. And then it's siesta time, it's only fitting after all the yum overload we go through every Sunday.

I'm not getting my Dosa fix since they're out of town, so I thought of improvising. I love how versatile Oats are, and if you can make Pancakes with them, you certainly can make a good Dosa as well. It's a #slite change that makes your life so much easier, not to forget healthier too! I make 3 different kinds of Oats Dosas, but the recent one I tried is the closest to a real Dosa. I used low sodium Tata salt lite to make it just that touch of extra healthy. You're gonna forget you're eating healthy, it's so good!


Instant Oats Dosa
Serves 2 (makes 6 medium sized Dosas)
Takes 20 minutes


Ingredients:

1 cup Instant Oats
1/2 cup Yogurt
2 green chilies
A handful of coriander, chopped
2 tsp Cumin seeds
2 tbsp Rice Flour (optional)
2 tbsp Semolina flour
Water, to adjust the consistency
Tata salt lite, to taste
Pepper, to taste
Ghee/oil to grease the pan.

Method:

Blend together all the ingredients except Oil, with some water (about half cup).
Let this batter sit for 15 minutes in a bowl. It will get thicker due to the Semolina and Oats. Adjust to a thick, dosa-like pouring consistency with water, add little at one time.

Heat up a pan on medium, preferably non stick. Add a drop of ghee or oil, and wipe the pan surface with a paper napkin so it is spread evenly. Add 3/4 ladle of batter and spread evenly. Add few more drops of Oil down the sides of the pan if desired. I also added some podi to the dosa at this point. You could also add chopped onions and tomatoes if you want this to be an uttappam. Cook on medium flame for 2 minutes.

Be careful while flipping her over, she's a delicate dosa darling! Cook for 30 seconds more and serve hot with chutney, podi, ketchup, or just have as is with a hot cup of Chai!

Tuesday, March 10, 2015

Recipe: Guilt Free Sugarless 70% Dark Chocolate and Baileys Ice Cream.


I am the Ross Geller of the ice cream world. I am not an ice cream lover because I think it is too cold. Soft serves and froyo on the other hand, I love. Back when we were kids, me and the little brother used to re-enact the sequence from the Jurassic Park movie, where the kids are eating ice cream and a Dinosaur creeps up in their house (we've all been there). We'd mix instant coffee powder in a Vanilla ice cream cup and stir it vigorously till it was of soft serve consistency and then race to who finishes last. Nostalgic. Sigh... How time passes by!

As much as I really-really-really don't like ice cream, I crave for it often when it's that time of the month. Same goes for chocolate- not a huge fan, but I want nothing but chocolate when I'm craving for it. Since I decided to make a sLITE change in my life, I thought why not come up with a guilt free ice cream recipe which would satiate my cravings and not make me get out of the house just to buy myself a cup? David Lebovitz had this recipe up on his site, and I tailor made it to fit into the sLITE lifestyle. I  also added a sprinkle of Tata salt lite to the recipe, to bring out the bittersweet taste. It literally takes 5 minutes to make the faux custard, and no churning at all! This may not be your friendly neighbourhood overtly sweet ice cream but it was still so good, I just had to share it with you guys!


A huge shoutout to the amazing folks over at Tata Salt Lite who are taking a great initiative with promoting the #slite lifestyle. You can look their pages up on Twitter and Facebook, or dial their toll free number to know more.

On to the nomness!

Guilt Free Sugarless 70% Dark Chocolate and Baileys Ice Cream.
Serves 2
Takes 5 minutes (+4 hours of freezing)
Adapted from David Lebovitz's blog.


Ingredients:

100 gm 70% Dark Chocolate (You can use any that you like)
1 cup milk (you can also use non fat or skimmed milk)
1 medium sized over-ripe frozen Banana
2 tbsp Cocoa Powder
90 ml Baileys (optional)
A dash of Vodka/Rum
A pinch of Tata Salt Lite

Method:

Melt the Chocolate and Cocoa into warm milk till uniform. You can do this over a pan on low heat, or in the microwave at 30 second bursts.
Blend together with all other ingredients till smooth.
Transfer to an air tight container and freeze for 4 hours or until set.
Scoop it out and sprinkle with Tata Salt Lite before serving.
Enjoy!

Note: we need to add alcohol to the recipe so that there is no crystallisation. You can omit the alcohol altogether, but know that the ice cream will be slightly hard in texture (like a Kulfi).

Friday, March 6, 2015

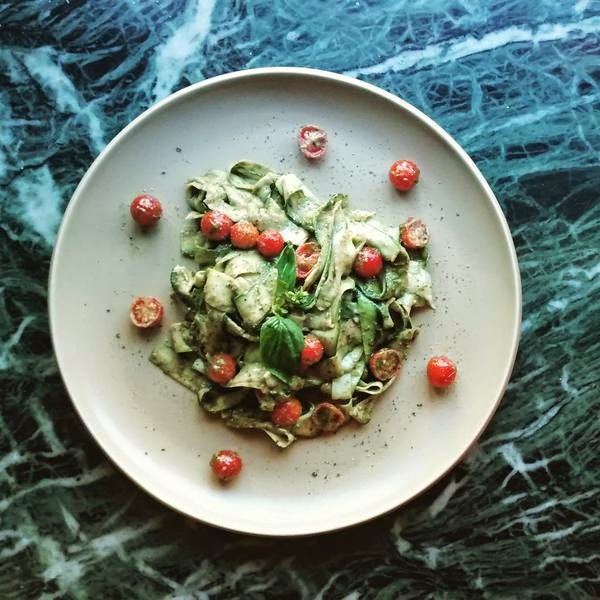
Recipe: Zucchini Fettuccine Salad with a Cashew Pesto dressing.


I am just realizing that my journey with Tata Salt Lite is coming to an end soon. I am so glad I did this, because it got me back my mojo, and it made me feel heard again. I am so grateful for all the love and support I have received from every single one of my readers, and with my blog recently crossing 1,50,000 hits, I have nothing to complain. You guys made this happen. Thank you so, so much. I have to celebrate this with something delicious, but not without my #sLITE change!


I had come across the recipe for Zucchini Spaghetti with Pesto and Buffalo Mozzarella last year over Twitter, and it has been fixed in my mind ever since. I have made numerous excuses to myself, right from Zucchini not being available in the market to 'I-don't-know-how-this-will-taste', from 'I'll-just-make-it-next-time' to 'It's-easier-to-make-an-omelet'. I stand corrected. This is hands down the easiest and yummiest Salad you'll ever come across. Bonus points because it is Vegetarian and a One-Up because it looks like Pasta.

Zucchini Fettuccine Salad with a Cashew Pesto dressing.
Serves 2
Takes 10 minutes

Ingredients:

1 large Zucchini
A handful of Cherry Tomatoes
4 cloves of Garlic
1/4 Cup Cashew Nuts
1 Cup Basil
Tata Salt Lite, to taste
Pepper, to taste
1/2 Cup Extra Virgin Olive Oil

Method:

Use a mandoline, peeler or spiralizer to shave Zucchini into your desired shape. I shaved super thin ribbons and cut them into thirds length-wise for Fettucine sized ribbons. You can also make Spaghetti using a spiralizer. Keep the Zucchini ready into a mixing bowl, in the refrigerator while you make the dressing.

Grind together Garlic, Pepper, Cashews and 1 tbsp EVOO (Olive Oil) until smooth. Then add in the Basil leaves, remaining EVOO and Tata Salt LITE to taste. Grind together till smooth. 

Pour the dressing over the Zucchini and toss to combine. Add in the cherry tomatoes. You can also tear up some fresh Mozzarella cheese if you fancy it. Serve immediately!


Tuesday, March 3, 2015

Recipe: Good-for-you Smoothie!


Around a decade ago, I was diagnosed with Anemia. While this is a fairly common problem with the women, it definitely should not be ignored. Since I was training to be a pilot at that time, even though my Haemoglobin levels were almost normal, they needed to be optimal. I saw my family doctor, an Air Force doctor, a Haematologist, an Ayurvedic doctor, a Homeopathic doctor, I took injections, but nothing helped me boost it all. While my haemoglobin levels were inter-linked to other problems in my body, my mother decided to stop everything and go natural.

I would have fresh juice every day that would consist of Spinach, Beetroot, Ginger, Lemon, Mint, Coriander, Carrots, Bottle Gourd and Tomatoes. One month later, my Hb levels were optimal. As much as I loved the juice, it always gave me the medicinal feel for the reasons that I was having it. But as years went by and I resorted to drinking this magic juice before every medical examination, I noticed that my skin was better, digestion was better and I felt and looked great. Since then, I try and incorporate these juices in various forms on a regular basis into my diet, my favourite being a Smoothie. One sLITE change that makes a huge difference in my life.

The hot rage is the superfood Kale and it would only mean I have to try it in a Smoothie. So I experimented, and as expected, I was wowed. You can add in whatever fruits and greens you like, chances are you'd love them too! So here we go:

Good-For-You Smoothie
Serves 3
Takes 5 minutes

Ingredients:

1 Cup Kale leaves
1 Green Apple, chopped.
1 Cup Tender Coconut Water + Any pulp from the coconut.
A handful of Grapes
2 tbsp Flax Seed Powder (optional, if you like that Smoothie extra thick)
1/2 Cup Ice Cubes
A pinch of Tata Salt LITE
1 tbsp Honey (Optional. I did not add it)

Feel free to add in a handful of Spinach leaves, even some Walnuts, Cashews and even Basil Leaves. You can substitute the Tender Coconut Water with Almond Milk, Yogurt, Soy Milk, or even regular water. You will need Honey in this case. 

Method:

Process all the ingredients in a blender until smooth and fine. Enjoy!

Thursday, February 26, 2015

Recipe : Paleo Butter Chicken.


Let me just start off by saying that this is a healthy dish. Oh, and it has no Butter in it. Allow me to explain.

As I've been constantly pointing out in my previous posts, fats are not bad for our body. In fact, fats are essential for fat loss. There are good fats and bad fats. Healthier fats like Ghee, Cheese, Olive Oil, even organic Butter are actually good for us if we learn to eat smarter. As per Dr. Asif Khan, my nutrition and workout mentor, "fats if used in a good way will increase your HDL levels, also known as the good cholesterol, while decreasing LDL that's the bad cholesterol as well as triglycerides". So, the next time someone asks you to stop eating cheese just because it contains fat, you can ask them to shove it. (Pardon my language, but if you are subjected to statements like those I'm assuming you'd be as frustrated as I get)

This is not the traditional butter chicken, but tastes like one, definitely. I have used Ghee and Coconut Milk in my recipe (don't worry it does not taste like a Coconut overload at all), both organic, and since its Paleo it also calls for free range Chicken, but you can also make this with the normal chicken available at the market. This sLITE change I've made in my life has put me on a new road altogether, and boy am I enjoying the journey! Thank you for, bringing this side out in me, Tata Salt Lite!


Paleo Butter Chicken
Serves 3-4
Takes 1 hour
Adapted from www.myheartbeets.com


Ingredients:

For the marinade:

500 gm Chicken (I used chicken on the bone. You can also use boneless thighs)
1 tsp Garam Masala Powder
1 tsp Red Chili Powder
1 tsp Dhania Jeera powder (coriander-cumin)
1 tbsp Lemon Juice

For the Curry:

1 tbsp Organic Ghee
2 large Onions, finely chopped.
250 gm Tomatoes, Puréed. You can also use canned tomatoes like I did.
1 tbsp Ginger Garlic Paste
1 tsp Kashmiri Red Chili Powder
1 tsp Dhania Powder
1 tsp Garam Masala Powder
1/2 to 3/4 can of Full fat Coconut milk. (400 to 500 ml if you're making it at home)
A pinch of Kasuri Methi
Tata Salt LITE, to taste.

For tempering (tadka):

1/2 tbsp Organic Ghee
6 cloves of garlic, finely chopped
1/2 tsp Kashmiri Red Chili Powder

Method:

Mix all the ingredients for marination and keep them refrigerated for 30 minutes.

Meanwhile, heat up a pan with Ghee, on medium high. Add in the Onions and fry them on a medium to medium low flame, until dark brown. This will take about 15 minutes on a  medium low flame.

Add in the ginger garlic paste and give it a stir. Add in the Chili powder, dhania powder and Garam masala, turn the flame to low and let the masalas bloom for a minute.

Add the marinated Chicken and toss to incorporate. Pour the tomato purée, and cook for 15 minutes with the pan half covered.

Keep the flame on low, add in the Coconut Milk and Kasuri Methi. Season with Salt, remember to adjust the salt content if you're using canned tomatoes and also remember that there is already salt in the Chicken that's marinated. Let it go for a few more minutes on simmer, about 3 minutes.

In another small pan, heat up the ghee for tempering. Add in the garlic and fry till it starts turning golden. Turn the flame off and add the Kashmiri Red Chili powder. Swirl it all together and pour over your ready Paleo Butter Chicken.

Garnish with Coriander leaves and a drizzle of Coconut Milk. Enjoy!

Note: you can also serve this with Paneer instead of Chicken. That would make a pretty nice Paneer Makhni! No need for Marination in that case, just add normal fresh Paneer.

Monday, February 16, 2015

Recipe: Kale Chips!


Kale is the new superfood in the market. Everywhere I go, every article I read, every video I watch, is gaga about Miss Kale. I just had to find out what the fuss was about, so I decided to make me some Kale Chips. But of course, I would not deep fry them. In order to make a SLITE change, I baked them instead, and sprinkled with low sodium Tata salt lite instead of the regular fare, and Oh My God! The possibilities with this recipe are endless! Not only are these chips nutritious, they can be your go-to for those midnight snack cravings, or while watching movies. They aren't crunchy, they're KRRUNNCHYYY (seriously, they make that sound while you eat them).


So what are we waiting for? Let's do this!

Baked Kale Chips
Serves 4 (Or 1. I really can't guarantee)
Takes 20 minutes.


Ingredients:

A bunch of Kale, washed, patted completely dry.
Tata Salt Lite, to season.
Pepper, to season.
A drizzle of Olive Oil. (Not Extra Virgin)
Any other seasonings (Chili flakes, brown sugar, sesame, Parmesan cheese, popcorn seasoning etc.)

Method:

Preheat oven to 170C/340F. Grease a cookie sheet or two with a tsp of Olive Oil.

Prep the Kale. We need to tear the Kale into bite sized pieces along the middle thick stem. Discard the thick stem. Please bear in mind that the chips will reduce in size as they bake, so tear accordingly. Transfer the leaves into a bowl.

Drizzle some Olive Oil and massage the Kale. You'll notice it will start to wilt a little. Season with Salt and Pepper, and any other seasoning you like. Massage well. Arrange on the cookie sheet such that the leaves are not overlapping one another. We want them to bake, not steam, and overlapping would make them steam.

Bake in the oven for 10 minutes or until bright green and crispy. Let it stay for a minute on the cookie sheet before you transfer them to your serving bowl. These don't stay very long as they're a crowd pleaser, but if you do intend on storing them, a brown paper bag would be a good bet!

I baked half of them with Salt and Pepper, and the other half with Chili Oil and Brown Sugar and mixed the two. We're having a lot of fun munching on the mixed goodness here at home!

Enjoy!

Sunday, February 15, 2015

Motivation: 10 Tips for Beginners who have just joined the gym!

Image Credit: Google Images


It was a very difficult decision for me to switch my blog from a normal food blog to shifting its focus to health and fitness. I have spent close to a year, procrastinating, thinking that making this switch would ruin what I already have, all my beautiful readers may get tired or bored, and honestly it was just another excuse. For a person who finds it easiest to express herself in the form of writing, it was like my life depended on it.

Now that I have finally taken the plunge, I am nothing but overwhelmed and awe-inspired. I am so thankful to each one of you who have been religiously reading my blog, trying my recipes, following my journey on various modes of social media, writing to me, pouring your hearts out and sharing your emotional struggles too. Seriously, I feel humbled. Thank you so, so much. One of you reached out to me and offered tonnes of helpful advice and it helped me a great deal. I am not revealing your identity, but please know that you have been very helpful! Thank you so much :)

Here is a list of 10 tips for beginners who have just joined the gym, written by one of my readers!

----

What prompts us all to join the Gym ?

We want to get out there in the competitive world, be it our friend circle, our work place, family functions, to stand out in any activity. looking fit & getting noticed for being awesomely built.

1. When you join the gym make a pact with yourself to be regular for
the first three months.


2. You will find many Gym pundits on the gym floor. Some of them may be
your friends, pumping Iron for the past many years. Please don't take
his Gyaan on the Gym floor. Your trainer will lose interest in you.


3. Be honest with your trainer with regards to your goal & the amount
of commitment you are ready to pledge to achieve your goal.


4. Once your body measurements are taken down by your trainer, make a
copy of the same & keep it for your record. Ask your trainer the next
due-date for measurements. (If your gym does not do this, please take your measurements and keep checking every month)


5. Discuss with Your trainer any/all medical injury that you are ailing from.


6. Modify your diet plan. Your body needs those extra quality calories
(proteins , carbs, etc ) to help you meet with your goal. Seek the
assistance of a certified  dietician.


7. Yes, You need motivation at the gym, a training buddy is a good
idea but not only will he have mood swings, different plans on certain
days. No two bodies are the same. So workout alone with a vengeance.
Your pump & burn should be Your best motivator.


8.Train Your core. Ask your trainer about your body type & never
hesitate to ask him questions, if any.


9. Educate yourself on fitness vide the Internet, journals etc


10. Please seek your Doctors go-ahead before you start an exercise regime.


PLEASE DONT TALK ON THE GYM FLOOR. THE GYM FLOOR AIN'T A PLACE FOR
SOCIALISING. YoU WILL END UP DE-MOTIVATING OTHERS.


------

My blog reader Nairutee who also spreads a lot of love over my Instagram feed (

I'd like to add a few more points to this -

> Stretch, stretch, stretch! Before and after workouts. One of the most imp elements people usually ignore.

> If you can't go to a gym there are tonnes of other options. Go to your nearest park,start with brisk walking and slowly build to a light jog. Take a jump rope along. Join a zumba / aerobics class. Once you start enjoying the exercise, you might just be motivated to join a gym to take your workouts a notch higher.

> Always.. Always keep a food journal. In this age of smartphones you can easily download a good app where you can log what you eat for getting a basic idea about how much you are eating (or over or under eating). This personally has helped me a lot eat more consciously and make better food choices.

> Workout not just to lose weight but to get fitter and build better flexibility and stamina. The weightloss will definitely happen.

> And last but not the least, don't do it for others - because your mother, husband, boyfriend asked you to. Till the time you do not make it "your own" goal - that you're doing it for yourself because you want to feel fitter and energetic and healthier - it will feel like a burden. So just accept yourself and start working on yourself and let your efforts do the rest of the talking :) 


------------------------
I think these tips are great! Don't you?

If you have something to share, you can write to me too! My email address is exploreyourkitchen at gmail dot com :) 

Thursday, February 12, 2015

Recipe: Gluten Free Sugarless Muffins!

 
Ever since I've made this switch to leading a fit lifestyle, I spend a little time every day researching recipes online on how to use ingredients more effectively. Just while browsing, the other day, I found this recipe and I decided to give it a try. It tastes quite amazing, and makes for a great pre or post workout snack. These little babies are super light yet keep you full for a considerable amount of time. Each muffin is a mere 95 calories, and you can make it better by smearing a spoonful of Nutella over it if you really feel like taking it to the next level.

I have to admit, these are not the best looking, best textured muffins you may have had, but they are a SLITE change that go a long, long way! These do not keep very well, due to the Bananas. But for all you know, they're gonna be over in no time anyway!


Gluten Free Sugarless Muffins
Makes 12
Takes 1 hour

Inspired by Ambitious Kitchen

Ingredients:

1.5 cup Gluten Free Oat Flour ( just blitz your gluten free oats in the blender until fine)
1 tbsp Baking Powder
1/4 tsp Baking Soda
1/4 tsp Tata Salt Lite
1 scoop Zero carb Whey powder (optional)
1 tsp Cinnamon Powder
1 tsp All Spice Powder
A handful of Walnuts, chopped. (Optional)
2 very ripe bananas, mashed
1/2 cup Greek yogurt
1/4 cup Honey
1/4 cup Date syrup (can be substituted with honey)
2 Egg Whites
1 tsp Vanilla

Method:

Preheat the oven to 200C/400F

Mix the Oat Flour, Baking Powder, Baking Soda, Cinnamon, All Spice, Whey, Tata Salt Lite and Walnuts in a mixing bowl.

Mix the Bananas, Greek Yogurt, Honey, Date Syrup, Egg Whites and Vanilla. I used a blender for this.

Add the wet ingredients to the dry and mix to incorporate. Spoon into 12 Muffin Moulds. Bake for 10-11 minutes!

Enjoy the guilt free indulgence!

Friday, January 30, 2015

Recipe: Cauliflower Couscous. When Couscous went Paleo!


I'm so grateful that Tata Salt Lite actually gave me the opportunity to speak for the cause, since I had been going through a writers block for the longest time. Since leading a fit and healthy lifestyle is a choice that I have made, this bodes well for me as well as my readers (I hope!) these little changes actually make a big difference in our lives. You can totally avoid the sodium loaded French fries when you go out to eat and opt for the humble baked potato without salt, and sprinkle your own low sodium salt on it as required. I have noticed that I am able to click better selfies, my clothes fit better, and I feel less lethargic when I keep my sodium intake in check. Of course, it's a little bit of everything like I always say. Eating healthy, working out and keeping your water intake and nutrition in check.

To tell you a little bit about what Paleo is, Paleo is short for Paleolithic lifestyle. I am not going to call it a diet, because it isn't. It's a lifestyle. We eat what our ancestors ate in the Paleolithic times. I have what you call a semi Paleo lifestyle, what with the food writing and everything else. But it does help me make an informed decision about what I'm eating. If you're interested, Google it right away!

Since couscous is a refined carb, I used Cauliflower as couscous for this recipe since its unrefined and is more nutritious, and also easier to digest for our body. I make this recipe so often that it is a house favourite! The gentle crunch of the cauliflower, the sweetness from the raisins, the saltiness from the olives and the smokiness from the chili flakes makes this a perfectly balanced treat!


Cauliflower Couscous
Serves 2
Takes 15 minutes
Recipe credit: watched on food network


Ingredients:

250 gm Cauliflower florets
1 shallot, finely chopped
1 tbsp Lemon Juice
5-6 Olives, roughly chopped
Mixed nuts, roasted on a pan. I used almond and pistachio slivers
15 Raisins/ Cranberries
Tata Salt lite, to taste
1 tsp Chili flakes
A handful of chopped coriander
1 tbsp Olive Oil
Extra Virgin Olive Oil, to drizzle on top

Method:

Pulse the cauliflower florets in a blender till they resemble the texture of couscous.

Heat a pan on medium high, add oil. Start with the shallots and chili flakes and give them a minute till they are sweet and translucent. Add in the cauliflower and sauté for 2 minutes.

Season with Tata salt lite, and sprinkle some water over the cauliflower. Cover the pan and turn the heat to low. Let it cook for 2 minutes. Lift the lid and give it a good mix.

Transfer to a plate and top with the nuts, olives, lemon juice, raisins, coriander and drizzle generously with extra virgin olive oil. You can add anything else you like, for example cumin powder, sumac, even grilled Apple would taste great!

Let me know how you like this!
Older Posts Home

LinkWithin