Showing posts with label Baking. Show all posts

Saturday, December 21, 2013

5 Things : A new series! Sofitel, Mad Over Donuts, Hard Rock Cafe, Faasos and a Cheese Overload!

I've been meaning to start this for a while now.

5 things that make me smile : Mostly about Food. But you know me, I'll put up anything!

So here it goes!

1. Lunch Buffet at Sofitel, Bandra Kurla Complex:


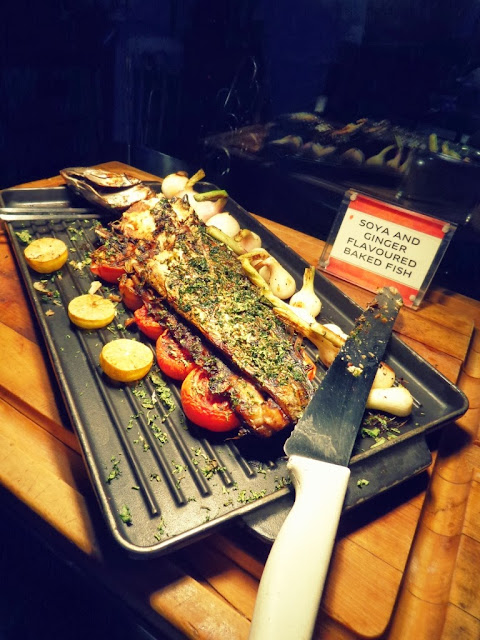
Tried out the brunch at Pondicherry Cafe recently, and I must say they have a pretty awesome spread! While they also have a live Pizza, Pasta and Noodle table, there are innumerable amounts of options and one could spend a leisurely time while enjoying sumptuous food! Special mention for the amazing Sushi counter and the Cold Cut and Fish station!

Tuesday, December 17, 2013

Happy 100th to me! And a Cupcake Recipe for you xx


I wish I could celebrate a blogaversary. I wish I was able to say that one fine day I had an epiphany that I must spread my knowledge about food and baking to the world. My story is so different, I started a blog by accident, and I can never have enough knowledge about baking or food. Just yesterday I met a gentleman who told me that food blogging has come down to nothing but a status symbol, with far too many people throwing around their weight gorging on free food and drinks, call everything delicious, lest they would have to explain their own research and knowledge about a certain cuisine or food item.

We have all had moments of revelation, the first time tasting a cuisine that does not revolve around Masala and Spices, and cook everything in a similar fashion. We all have had those moments when we opened ourselves to newer horizons and decided to break out of the ordinary. Why do I need to add a sprinkle of chaat masala or a squeeze of lemon over every thing I eat that is not Indian? Why can't I add Cheese to a Rabri? Or can I? I, for one, have learned a lot about respecting ingredients. I have learned a lot about experimenting with food and also learned the hard way that there is a thin line between creating something that makes the world go 'wow' and on the other hand, makes them feel like this is not their cuisine anymore. You can mix it up, but do respect the actual identity of the dish or cuisine.

For all of you who have been following my writings all through, I am pretty sure you know me a little bit by now, and how it is like to be with me. I am moody, fussy, I talk less, I think a lot, and I am basically in my own world at most times. I do love to eat. I respect and understand that everyone has a separate outlook towards food and I am only glad that you can connect with mine. I never thought I would actually get to the point that I will have to write a 100th post, but now that I am here, I just have to share something special with you guys. So here is a Cupcake recipe I dearly love.

And I will just call this my Blogaversary :)


Chocolate and Salted Caramel Cupcakes.
Makes 12-18 depending on the size.
Source : Sweetapolita and Self.

Ingredients:

1 Cup all-purpose flour
1 Cup granulated sugar
50 g Cocoa Powder
1 teaspoon baking soda
1/2 teaspoon baking powder
Pinch salt
2 eggs, at room temperature, lightly beaten
1/2 cup strong, hot or cold black coffee or espresso
1/2 cup buttermilk, room temperature
1/4 cup vegetable oil
1 tablespoon pure vanilla extract

For the Frosting:

1 Cup Heavy Cream, Chilled.
1 tsp Sugar
1 tsp Vanilla Extract

For the Salted Caramel Sauce:

100 gm or 1/2 Cup Granulated Sugar
4 tbsp Butter
1/4 Cup Single Cream

Method:

Preheat oven to 170C/350F

Mix all dry ingredients: Flour, Sugar, Cocoa, Baking Soda, Baking Powder, Salt.

Mix all wet ingredients in another bowl: 2 Eggs slightly beaten, Coffee, Buttermilk, Oil and Vanilla.

Add the dry ingredients to the wet ingredients and mix well.

Bake the Cupcakes for 13 minutes per batch and more or less depending on done-ness.


For the Frosting:

Whisk the Chilled Cream in an ice bath, add the Sugar and Vanilla after 30 seconds of whisking, and whisk to form stiff peaks. Fill it up in an icing bag.

For the Sauce:

Heat up a small dry pan with Sugar on medium heat, until its all melted and turns into an Amber color. Take if off the heat and then add Butter. Whisk it till incorporated, and add in the cream. The mixture will splatter, so beware (or wear gloves). Put it back on the heat while it bubbles and stir till all lumps are melted away :)


That's me making some Caramel Goodness!

If you want to reduce the sauce and make it thicker, keep heating! Else, remove it and drizzle over anything and everything! Here I've drizzled it over the frosted Cupcakes (and also cored a hole and filled them up inside before frosting) but I love it over ice cream, fruit, coffee, or even by itself!

Friday, January 18, 2013

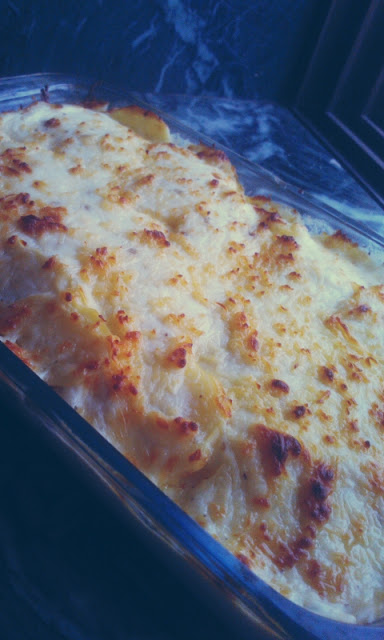
Vegetable Au Gratin. Coz my Mother craves for exotic food.


I think I've completely taken after my Mother, especially in the department of having hunger pangs. These hunger pangs are rather specific and detailed, such as having Pav Bhaji but only from Amar Juice Center during peak hours of traffic. I wouldn't blame her

Wednesday, January 16, 2013

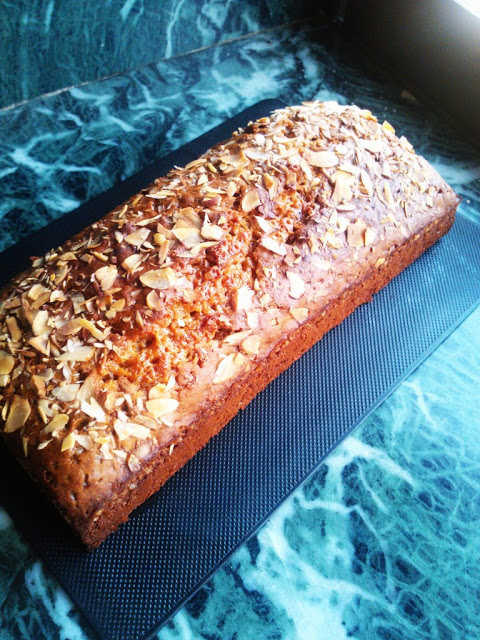
No Oil/Butter Fijian Honey Cake.


I cannot "diet" to save my life. Crash dieting and starvation is not my way to fitness nor have I ever been able to stick to it, and no one should. In the past year I have learned to accept myself for what I am, and work around it to make myself better. If there was one thing that I had to state which was a bad habit of mine with regards to eating healthy, I would definitely say that it is when I absolutely need

Wednesday, November 28, 2012

I am a Pavlover. You will be one too, after you try this Pavlova.


Here is why everyone who bakes should invest in an electric whisk. People like me think we can handle working our whisks like a mean machine and whip up Egg Whites and Whipped Cream. We come across recipes that are so simple and take them up, and then make a complete fool of ourselves over and over again. From hand whisking egg whites for an hour to whipping this batch of whipped cream with a large whisk for about 90 minutes, I can say that I have pretty strong forearms. Have a look at the video:

http://youtu.be/c6L3ATWetig

The first thing I wanted to do when I bought an electric whisk

Monday, November 12, 2012

Baked Herbed Garlic Potato Wedges with a Homemade Gravy. Coz that is how I recommend you try it.


French Fries available in India feel like they are half heartedly done. I underwent the life changing experience of having Fries with Gravy during my stay in Canada and now that I am back here, French Fries feel incomplete! If it were up to me, I'd go borrow, beg or steal some Rennet from somewhere and make my own Cheese Curds so I could show you guys the ultimate recipe - Poutine (French Fries topped with Fresh Cheese Curds topped with Piping Hot Gravy!).

Friday, October 5, 2012

Bettering Breakfast #8 Guest Post : Never Say No To Early Morning Scones!


Image Credit : Richa @ Knead With Love.
Scones are the death dish in my kitchen. I have never had a lucky day with them. Which is why when fellow blogger, a sweetheart and a storyteller of her own, Richa Lulla from Knead With Love volunteered to write for the Bettering Breakfast series and said she wanted to do Scones, my heart was filled with glee and a hole started digging itself in my stomach craving for these beauties. I might have to barter some of that Herb and Green Garlic Butter with the lovely lady in exchange for few of those Scones!


I could write everything about Scones and my hard luck with them, just like I did with the Chocolate Eclairs, but I will wait and learn from Richa and maybe write a victorious post about Scones later. For now, I would love to wake up to Scones just like it is mentioned on her blog.


The beautifully written blog post is here and you can find the recipe with detailed instructions too!


Saturday, September 22, 2012

Bread Making Workshop at Eat Around The Corner, Bandra


 We all love freshly baked bread. I love the aroma that fills the entire house when I bake bread, and to say that I trip on it would be an understatement. I have been a fresh bread convert since I baked my very first bread last year. But more often than not, I find myself in a time crunch and end up buying the Multi Grain bread from outside. When I received an invite for a special bread making workshop

Thursday, August 23, 2012

Pak Pak, not Bhow Bhow!! Roast Chicken with Assorted Roast Thyme Potatoes and Gravy.


I am expecting to get many hits on this particular blog post. There have been drooling responses and emails and tweets and comments for this recipe picture! :) So let me cut directly to the chase coz' Roast Chicken with Potatoes is something that every single one of us would describe in a different way. For some it may classify as soul food, for some an absolute feast and for a rare crowd it is something that needs copious amounts of heat and spice added over to it. But for me, this dish means warmth. You feel at home anywhere you have this dish and that is why I decided to make it with the best friend, our mini cooking assignment!

I decided to also add in Sweet Potatoes along with normal Potatoes and I personally like them better than the normal potatoes when roasted. So here we go!


Thursday, August 9, 2012

Baking Disaster : What NOT to do when you make Chocolate Eclairs.


It is very important for anyone to live life with failures. I mean never be afraid of admitting failure. And for people like me who never get things the easy way, we really don't have a choice but to accept it, only with the desire to strike back harder and doing better the next time. I personally believe that if you get something easy, you probably won't value it as much as a person who has worked their ass off at getting something, getting thrown off at every stage.

Cooking did not come to me easy either. A certain someone has had to go through many stomach upset syndromes and has had to even fight with me over having to cook food just so that I do not make another batch of undercooked rice or a Mysore Dosa with a kilo of Beetroot too many. But with all those trials and errors, I think I got somewhere!

Just like that I had the craving for a Chocolate Eclair, since I was yearning to cook after recovering from a Viral Fever and having bland food (well everything tasted bland to me anyway) for 10 days. It did not seem all that difficult and I had everything I needed at hand, so there I began. Little did I know that it was a gentle push to send me tumbling downhill into a puddle of cheap cocoa icing.

Well I am being overcritical of myself. But the least I can do is not make the same mistakes again and even though whatever came out of it tasted good enough for my brother to finish all of it, I must make the prettiest chocolate eclairs sooner than later.

I started off with my dear friend Google and fished out for recipes that seemed easy enough to put together quickly. That was my first mistake. There are no short cuts to awesomeness. Every single time we substitute or compensate for something in a recipe, we compromise on the real deal.

The Chocolate Eclair has 3 major components:

  • The Choux Pastry Puffs
  • The Crème Patissière
  • The Chocolate Topping.

I made the Crème Patissière from my trusted recipe, (at least I did something good) and it was nothing short of perfect. *gentle pat on my back*


I looked up too many recipes for the Choux Pastry Puffs. Second mistake. There was too much to know, not exact instructions about the right texture and too many ways to do it. I only realized I was going wrong when I watched a video of Gordon Ramsay doing Profiteroles with Choux Pastry but I was a bit too late since I had a batch of too runny Choux Pastry sitting in my kitchen. Thank heavens I did not throw it away, but I did make a new batch which seemed to hold its shape better.


This was the second batch of Choux Pastry. I piped some out as little Profiteroles too. Now this recipe asked for them to be baked at 200C but since I read too much I decided to bake them at 180C for 35 minutes (Third Mistake). They came out looking like this at the 20 minute mark.


They tasted yummy, but did not rise at all and lets be honest they were a little burnt too. Disheartened, I decided to pipe out the first batch anyway. I mean, nothing to lose right? And to my surprise they rose beautifully.


But I did not keep an eye on them properly. I did not trust my gut this one time and it just went all pear shaped. I over baked them and this is what happened.


But at least they were much better than the mess which did not even rise! I decided I will make the eclair come what may.

So despite having a 500gm slab of Callebaut Cooking Chocolate at home (which would have made an amazingly luscious Ganache), I decided to go for a Cocoa Icing (Fourth Mistake). Just some Icing Sugar, Cocoa Powder and Hot Water mixed together. Then I added Coffee to it too.


And finally my Fifth Mistake was to sandwich two eclairs with Crème Patissière rather than Piping it inside the fluffy eclairs.

When I drizzled the Icing on the eclairs, it all was too runny and just did not taste right. But it tasted like something which was almost there (except it was not) and how if I had been a little more attentive and sorted I would have probably made a pretty cracking chocolate eclair!


I end this by saying that I am anything but a quitter. I will master you, Choux Pastry! Just you guys wait for my Chocolate Eclair post!
Monday, June 18, 2012

Baked Homestyle Mac n' Cheese. Could this BE any easier?


I find myself worrying a lot when I have to cook for a crowd. I mean a small crowd of 4-5 people. As much as I love feeding people I also like to take the quick way out and not punish my body by spending an entire day in the kitchen. If it's quick, could be planned ahead and gives me a lot of free time while it cooks, I am in love with such recipes already. Add to it when they are fancy as well as served homestyle, everyone is a winner.

I made this Homestyle Mac n' Cheese over a year ago for a house party for my brother's friends, and I had to remake it thanks to people asking me for the recipe and saying they still remember how it tasted. The beautiful garlicky bread crust on top adds a new dimension altogether to the ever so awesome classic. I tweaked the recipe a bit to incorporate less cheese (if it cuts down calories without compromising the taste, why not?) and added a good dash of Nutmeg. Hope you guys like it!

Homestyle Mac n' Cheese
Serves 5
Recipe : Various + Self

Ingredients:

300 gm Macaroni elbows (I used Semolina Macaroni)
1 cup Milk
1/4 Cup Butter (I used Ghee)
3 tbsp All Purpose Flour
1 tsp Nutmeg Powder
2 tbsp Pepper
Salt to taste
1 cup of Water in which the Macaroni was cooked
1.5 cups Loosely packed shredded Cheddar Cheese.

For the crust:

5 slices of stale bread. Crumbed
A handful of Coriander/Cilantro leaves, chopped
2 tbsp Butter/Ghee at room temperature
A pinch of Salt
1 tbsp Sugar
6 cloves of Garlic, minced.


Method:

Cook the Macaroni elbows as per package instructions until al dente. They should be almost cooked.


Drain them in a colander but be sure to reserve a cup of Pasta Water. Just in case.


In a deep pan, heat up the Butter until its bubbling up. (I used Ghee so no bubbles for me)


Add in the Flour and stir to make a Roux. It would look frothy and bubbly.


Add in Milk and stir well. You can feel the mixture thicken up.


Add in Salt, Pepper and Nutmeg Powder. Stir to incorporate.


Now add the Pasta, followed by the Cheese and mix well.


If the pasta feels too dry, add in some Pasta Water. Remember we're gonna bake this so it's gonna get dryer in the oven.


Transfer this all to a baking dish. Preheat the oven to 200C/400F. Crumb the bread slices in a Food Processor.


In a bowl, Mix together the bread crumbs with Coriander, Garlic, Salt, Sugar and Butter, with your fingertips to form a moist bread mix.


Layer this over the Mac n' Cheese on the Baking tray. Cover up as much as possible.


Let this big guy go into the oven for 15 minutes or until there is a light golden crust on top.


Remove, let it cool for 10 minutes and serve! Super yummy homestyle Mac n' Cheese is ready!


This one is a total crowd-pleaser guys!

Wednesday, June 13, 2012

Chocolate Chip Monkey/Sticky Bread. This is what has been missing alongside your Coffee.


The aroma of bread baking in the oven is by far the best aroma to wake up to in my book. I rate it way above the aroma of even a freshly brewing coffee. I cannot stress enough on how awesome home baked bread is over anything store bought. You can do so many things with it, and it's like taking care of a baby, the handling process, the eternal wait while it increases in volume and to watch it bake in the oven and develop that beautiful golden brown on it's outside. I also did a 55 word fictional story on it sometime back, and would love to quote it here. The theme for the 55 word story was "Sexy"

I run my hands all over you. I know that the messier I get, the better would be this climax. I apply some pressure. But I must have faith, I must have patience.  Your yeasty fragrance penetrates through all my senses, and makes me feel so Sexy. Oh my freshly baked loaf of homemade bread!

I am that addicted to home baked bread. So when I saw this recipe on my most favorite food blog Macheesmo, I just knew I had to try it. And I highly recommend that you try it too. I baked this for my brother and his girl and this was the mood in my house.


So without any delay, I'm gonna put down the recipe for yummy in your tummy, and all other senses too. Here it goes:

Chocolate Chip Monkey Bread
Serves 10.
Recipe from Macheesmo


Ingredients:

For the Dough:

2 tbsp Butter, melted.
1 cup milk, warm
1/3 cup water, warm
1/4 cup granulated sugar
1 tbsp instant yeast
3.25 cups all-purpose flour, plus extra for rolling
2 tsp salt
3 ounces semi-sweet chocolate chips
1-2 tbsp butter, soft for bundt pan.
1 tsp vegetable oil, for rising

For the Brown Sugar Coating:

1 cup brown sugar
2 tsp ground cinnamon
8 tbsp unsalted butter , melted

Glaze:
1 cup powdered sugar
2 tbsp milk


Method:


Get your Bundt Pan all greased up. I left mine in the fridge till I needed it coz otherwise the butter would melt up.


Mix up everything except Salt and Flour, stir and let the mixture sit covered for about 15 minutes.


Sift Flour and Salt together.


In 15 minutes, your mixture would look frothy like this.


Add it to the dry ingredients.


Knead into a smooth dough. Transfer it to a bowl rubbed with Oil and rub with some more oil over the top, cover and let it sit for 1.5 to 2 hours, till it almost doubles in volume. Punch the air out, and get a nice huge surface dusted with flour to work your bread.


Roll it into a nice huge rectangle. Mine looks like a weirdass shape! But no worries :)


Add chocolate chips on one side of the rolled dough.


Now fold it over!


Get your Melted Butter and Brown Sugar ready for dipping. Pull your Bundt Pan out of the fridge if you have put it in.


Mix in Cinnamon with the Brown Sugar


Now is the fun part. Cut the folded dough into squares.


Now dip them one by one in the Butter, and then the Sugar mixture, and then lay them in the pan.


Or if you are lazy like me, just put in all the squares in a dish, pour over butter and sugar mixture and mix it. Line the pan with these squares and pour the remaining butter mixture from the dish on top.

Let these rise for a further 30 minutes. Meanwhile Preheat the oven to 170C/350F


Nicely risen! Now bake them for 35-40 minutes. Mine took 35 minutes. Keep a dish under the oven rack for all those overflowing juices and wait for gorgeousness.


Just look at it rise!


Just out of the oven!! Invert this on a plate after cooling for 15 minutes, work on the glaze in the mean time. Just mix the milk and sugar together and keep the paste ready.


Now to glaze it!


And then to pull apart with hand or toothpicks, and eat it!


And that is why,
Homemade Bread >>> Store Bought Bread.


Older Posts Home

LinkWithin