Showing posts with label Appetizers. Show all posts

Friday, March 20, 2015

Two Recipes with Dal! Dhokla and Mulligatawny Soup!


Did you guys know that World Water Day is around the corner? I, for one, have been in the water-wasters club for many years, with brushing my teeth leaving the tap on. While this is one of the major habits one needs to change in order to conserve water, there are many more (especially in the kitchen) which won't take much getting used to and will in turn impact our water conservation practices in a hugely positive manner. Here are a few:

1. You do not need to use a lot of water while boiling vegetables. The idea is for the water to just cover the vegetables in it. Instead of pouring out the water, you can use that flavourful Vegetable Stock in place of water while cooking your next meal!

2. Don't use water to defrost food. You can just leave the frozen food in the fridge overnight instead!

The good folks over at Tata I-Shakti have taken a great initiative during this #WorldWaterDay to make everybody aware of these little things, while also talking about their wholesome unpolished Dals. I have made the switch recently, and I could not be happier. Not only does 1 cup yield more Dal as compared to polished Dal, these Dals only require 2 cycles of rinsing as opposed to 4 times with the regular polished variety. Not to forget that the Polished Dals also are stripped off of their nutritional content.


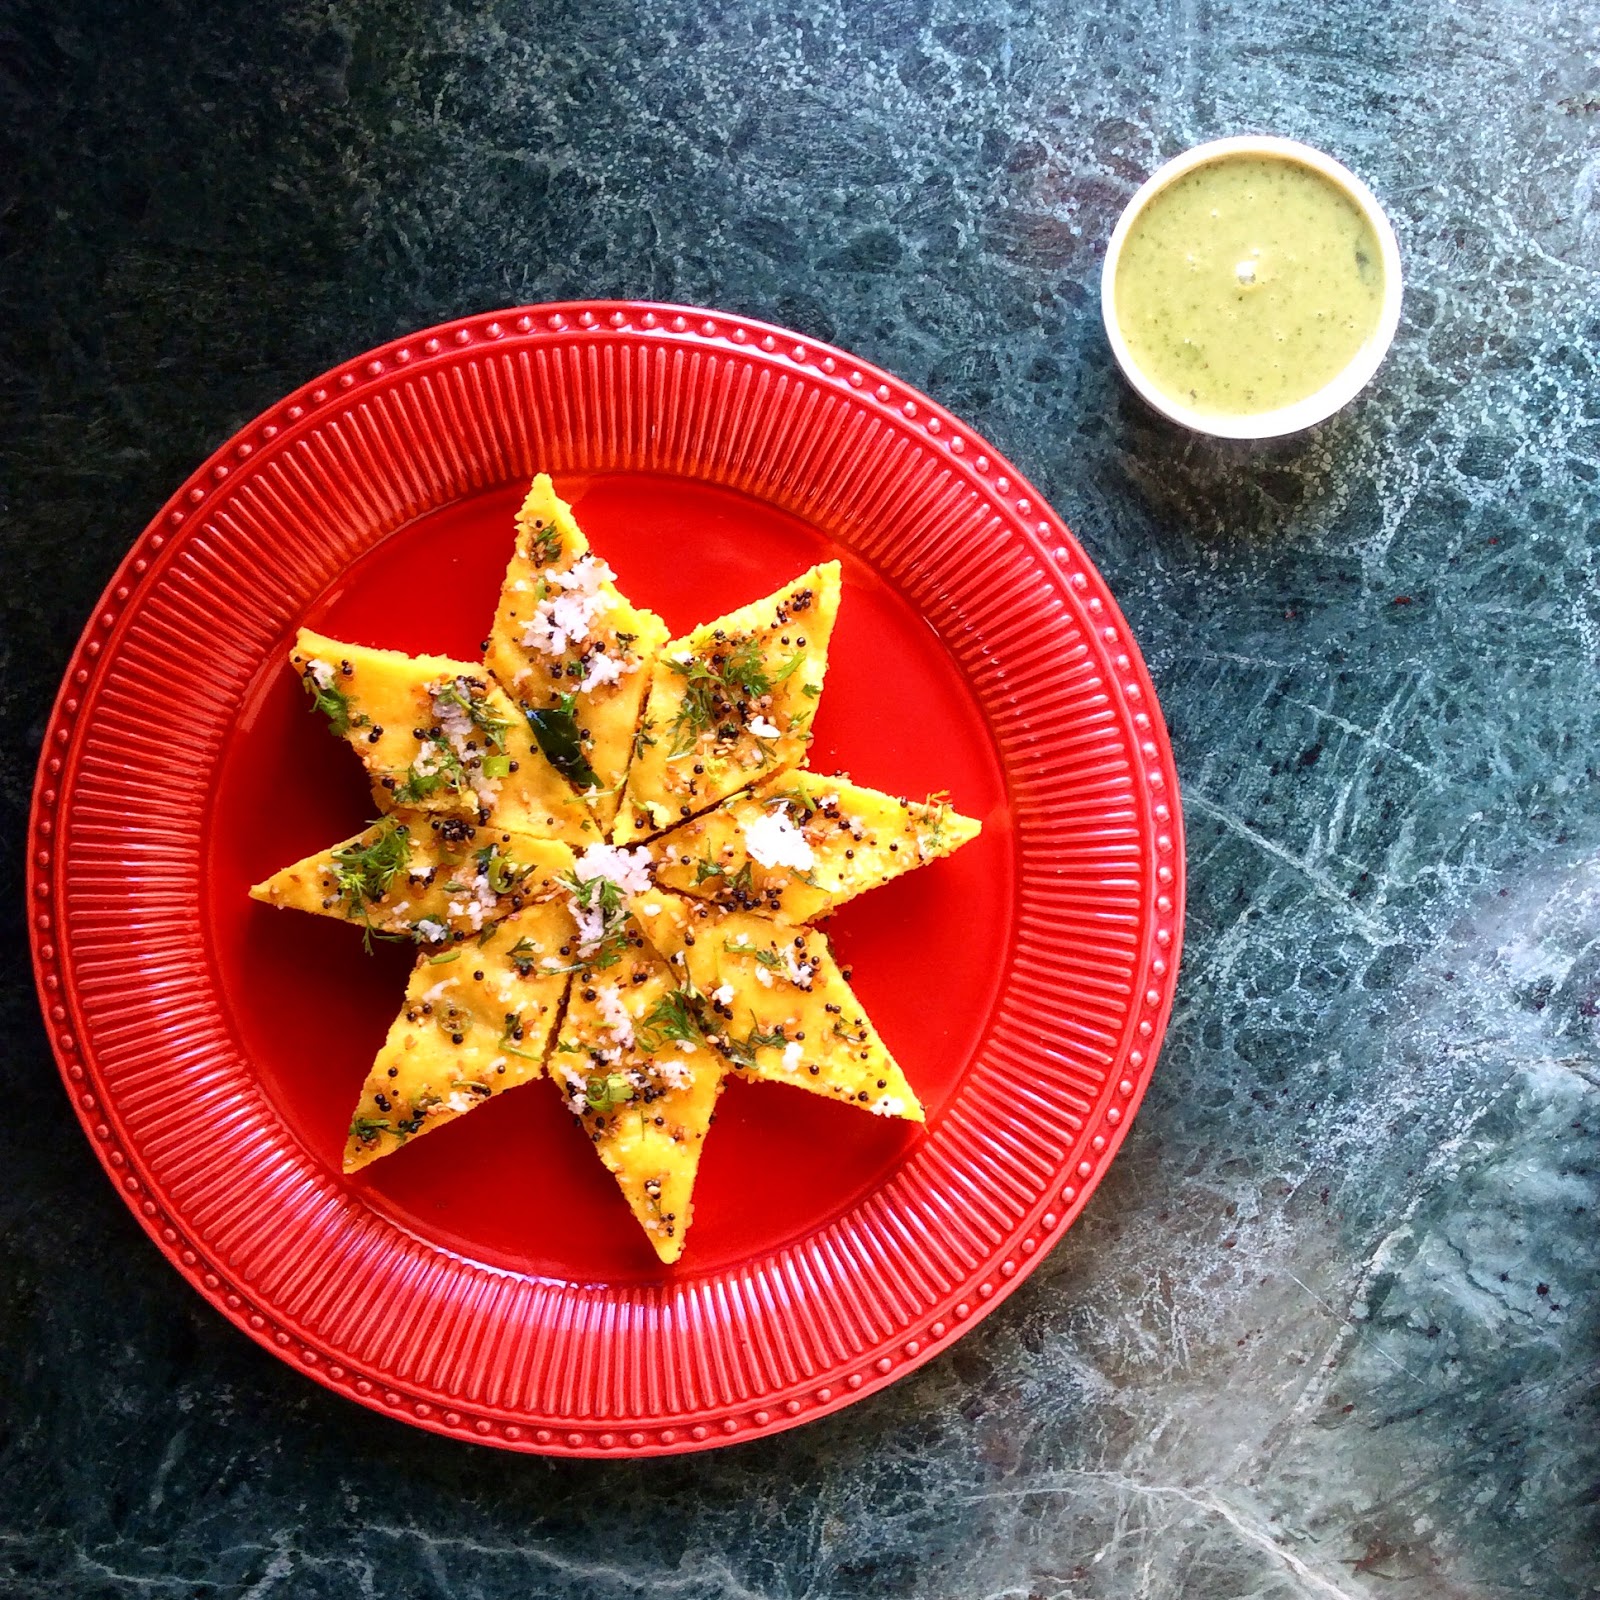
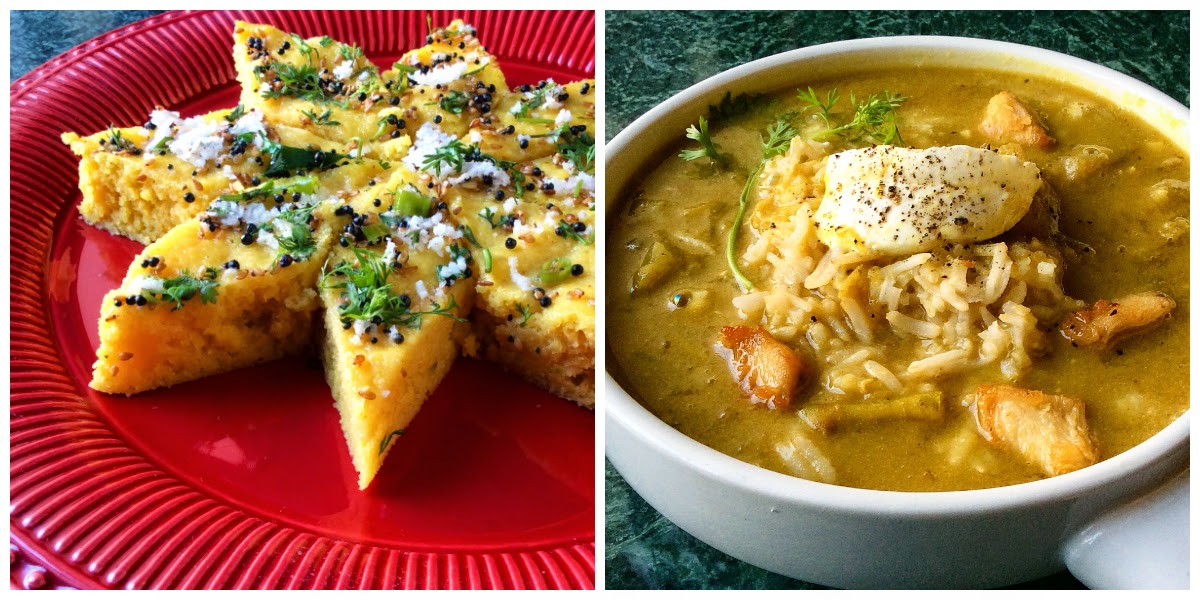
On this blog post I will be sharing 2 recipes from my kitchen, that waste minimal amount of water. First one is a healthy take on the globally favourite Dhokla, which I have been making with Moong Dal off late. Not only is this healthier, I have used the soaking water to blend the soaked Dal, instead of pouring it down the drain and replacing with fresh water.


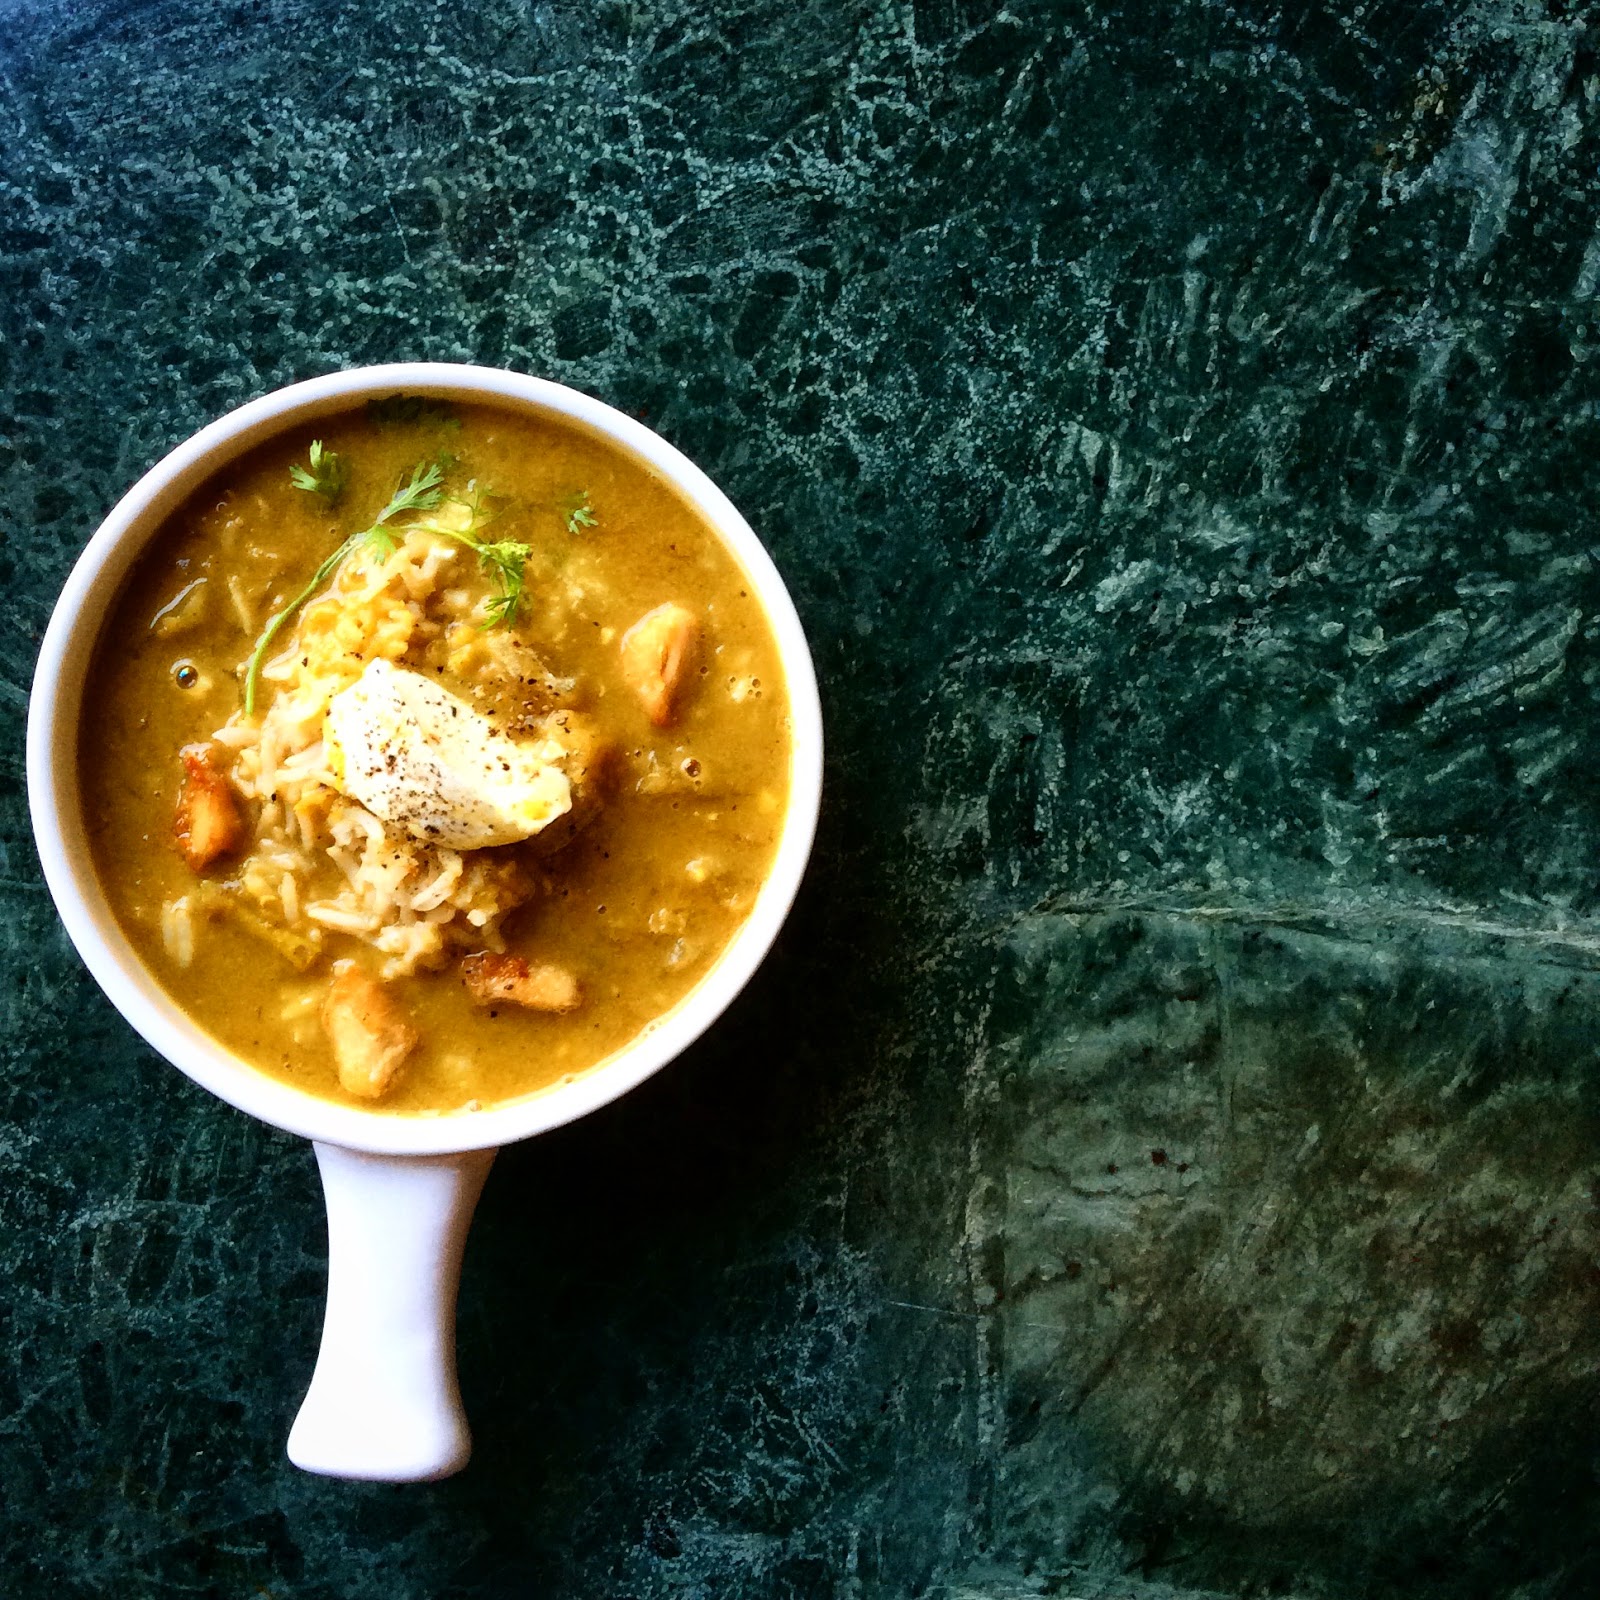
The second recipe has a story of its own. It is the world famous Mulligatawny soup. Mulligatawny soup comes from Mooluga Thanni, which literally translates to Pepper Water. It was served to the soldiers during the British Raj in India, just because they demanded there be a Soup course. Well, the British left, they took the recipe with them, and heavily anglicized it to suit their palate. They added meat to the soup, thickened it with Coconut Milk, but I am not complaining, for I am a huge fan of this dish! It may be a bit lengthy but it is really easy, and the final product will blow your socks off. I guarantee it.

So, without further ado, I present these two recipes to you, one by one!


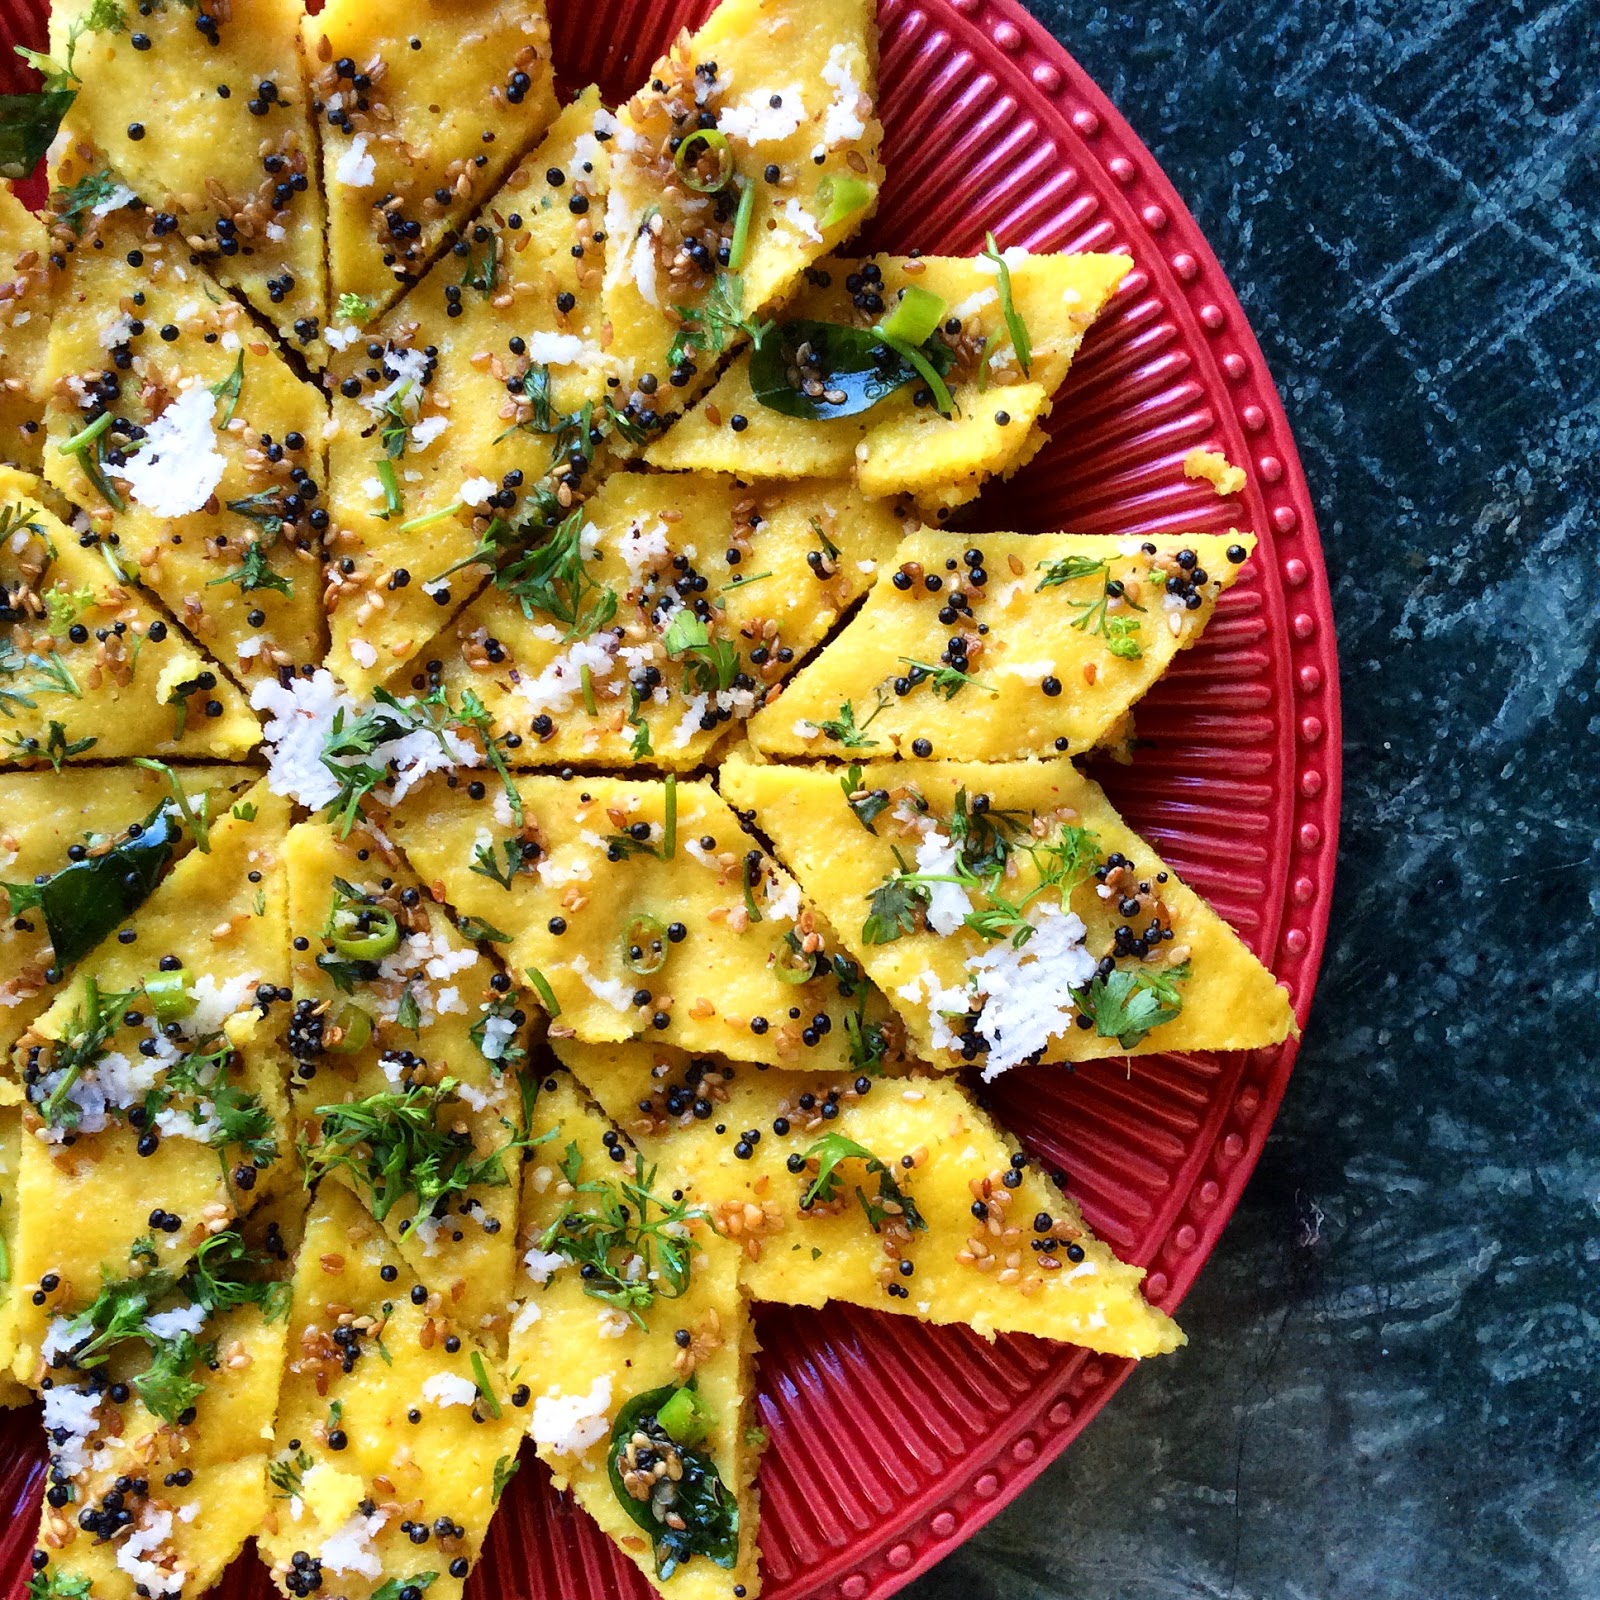
Recipe: Moong Dal Dhokla
Serves 6
Takes 20 minutes plus 4 hours soaking time.


Ingredients:

1 cup Tata I-Shakti Moong dal.
2 cups Water
An inch of ginger
2 Green Chilies
2 tsp Salt
1 tsp Red Chili Powder
1/2 tsp Turmeric Powder
A pinch of Asafoetida (heeng)
1 tsp Oil plus some more for greasing
1 tsp Eno Fruit Salt or Baking Soda

For the Tempering:

1.5 tbsp Oil
1 tbsp Mustard Seeds
1 tbsp White Sesame Seeds
2 Green Chilies, Chopped
6 Curry Leaves
A pinch of Asafoetida
3/4 Cup Water
1 tbsp Sugar (optional)

For Garnishing:

A handful of Coriander leaves, chopped.
A handful of Grated Fresh Coconut, scraped.

Method:

Soak the Moong Dal in 2 cups of water for 4 hours. Drain it but reserve the water.

Grind it in a blender with the Chili and Ginger. Use the reserved water (add more if desired) to get the pouring consistency like that of a Dosa.

Set up your steamer on the stove. Grease the steaming plate with Oil. I used 2 flat plates.

In the mean while, mix in the Turmeric, Red Chili, Asafoetida, Salt and Oil and give it a good stir. Just before adding into the steamer, add in the fruit salt and mix well with a steel spoon such that the batter is fluffy. Pour it into the two plates and set them in the steamer.

Steam for 12 to 15 minutes, then turn the heat off and let it stay for another 2 minutes. In the mean while, make the tempering.

Heat up a small pan with the Oil. Add in the mustard seeds, when they pop add the Asafoetida and the chopped chilies, followed by sesame seeds and then curry leaves. Let them splatter. Top this up with water and Sugar if desired, and let the mixture come to a boil. Turn the stove off and keep this aside. You can choose to skip the water soaking step, but I like my Dhoklas moist.

Remove the Dhokla from the steamer and cut them into desired shapes. Soak them with the water from the tempering, and add the tempered goodness all over them. Garnish with Coriander leaves and grated coconut. Serve with chutney!


-----------------


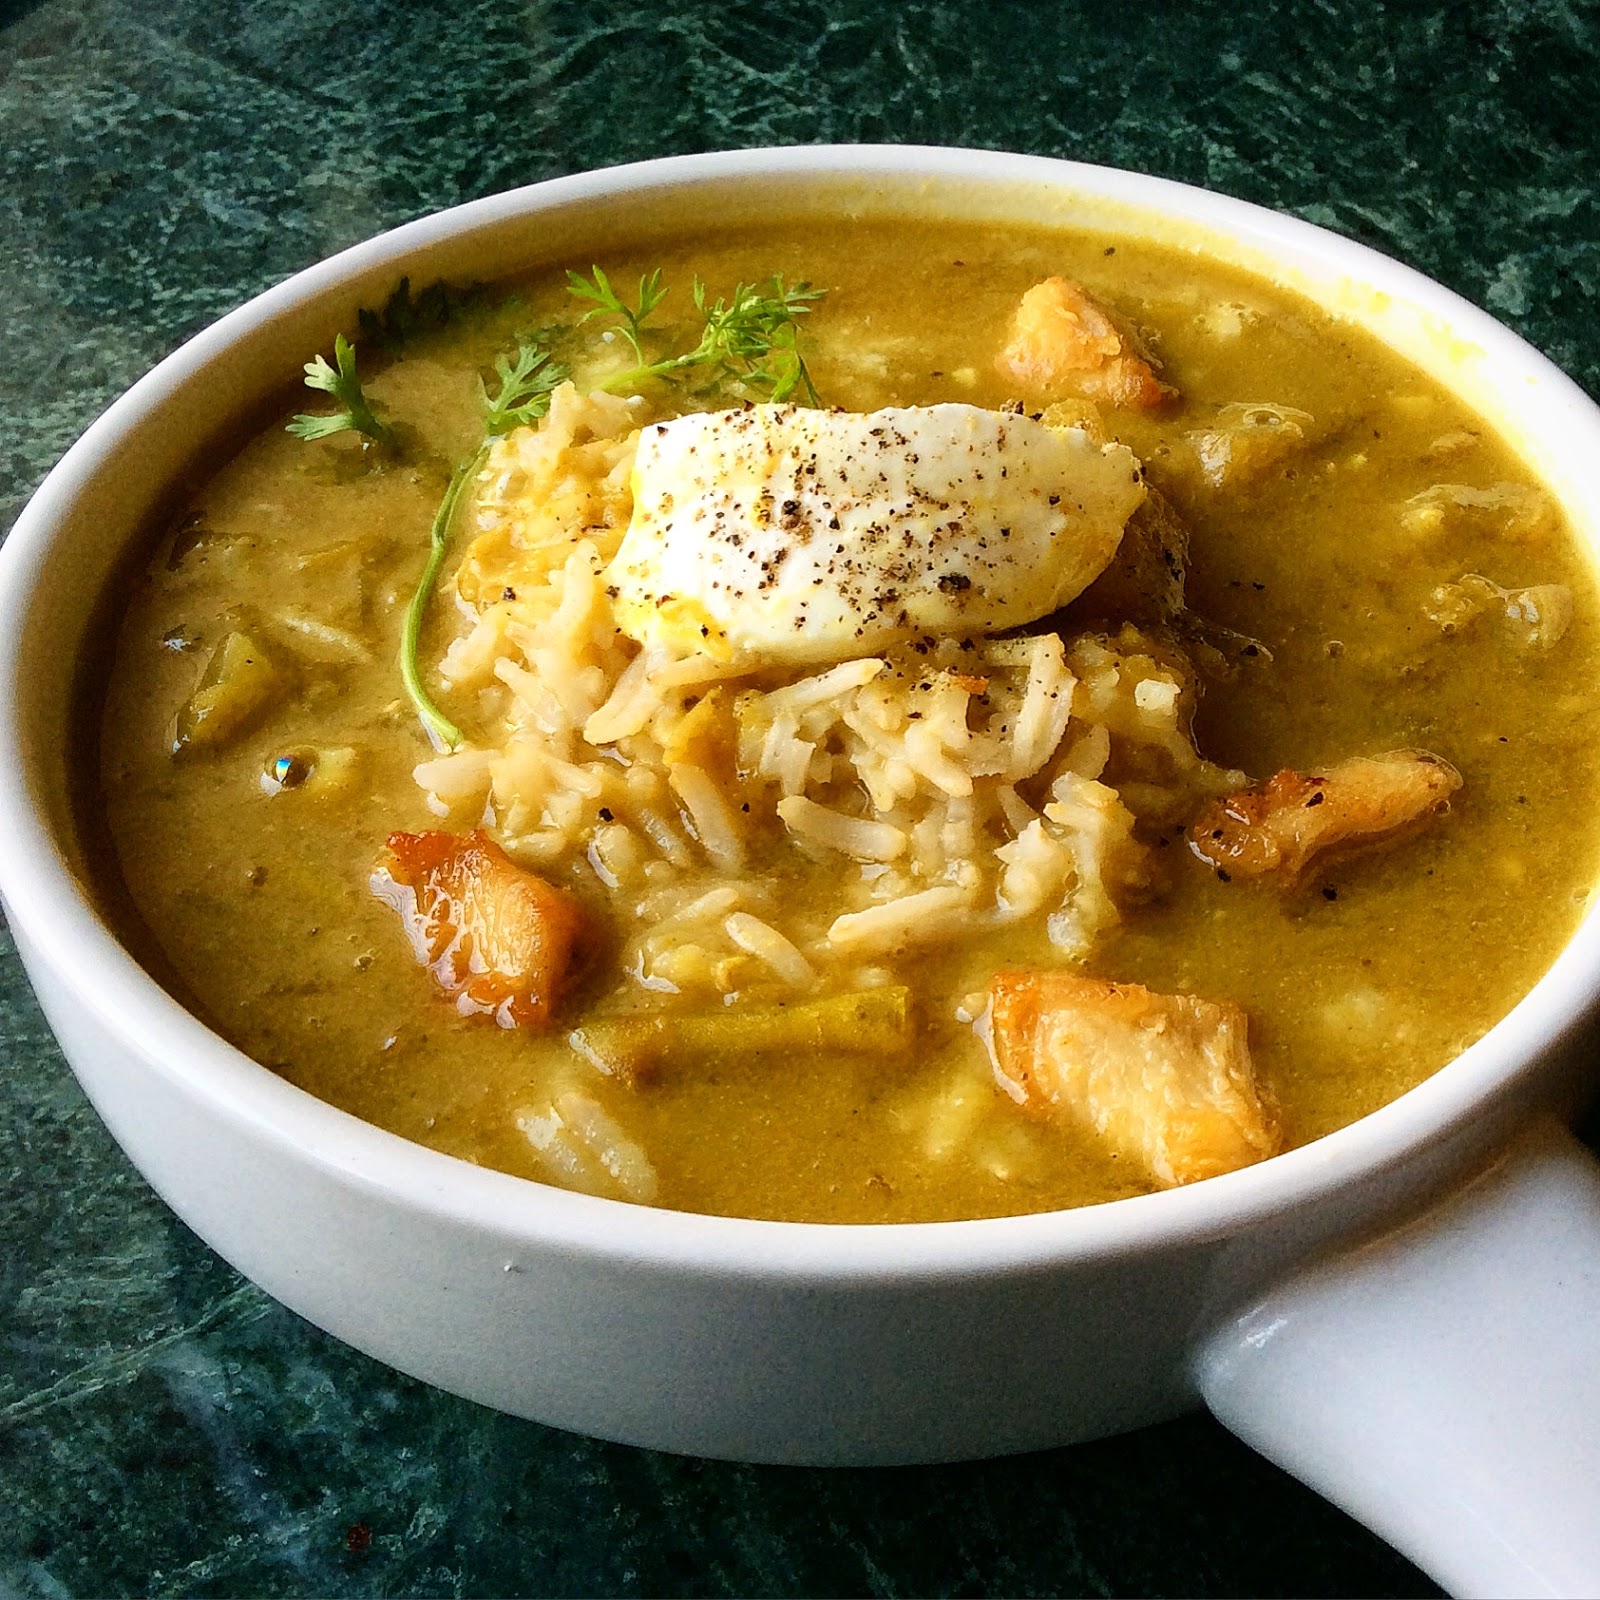
Recipe: MulliGatawany Soup
Serves 4 to 5
Takes 1 hour
Ingredients:

An inch of ginger
6 cloves of Garlic, finely minced
1 large Onion, finely chopped
1 Green Apple, peeled and diced.
½ Jalapeño, finely chopped (optional)
2 tbsp flour
½ tbsp. Coriander Powder (Dhania Powder)
1 tsp. Cumin Powder (Jeera Powder)
 ¾ tsp. Turmeric Powder (Haldi)
4 cups chicken stock or vegetable stock (You can use 4 cups of normal water, and add a stock cube to the masala while cooking, or you can also use plain water)
¾ cup Tata I-Shakti Red Lentils (Masoor Dal)
A handful of Coriander leaves, chopped.
½ cup Coconut Milk
Salt and Pepper, to taste
4 tbsp Oil
A cup of cooked Basmati Rice (You can substitute with Brown Rice for a healthier alternative)
A dollop of Yogurt, to garnish.

Method:
Soup: Heat 2 tbsp Oil in a deep pan over medium high heat. Sauté the Ginger, Garlic, Onion and Jalapeño until the Onions are translucent. Add in the Apples and give them a minute, then add Coriander Powder, Cumin Powder and Turmeric Powder and stir till the masala blooms. At this point, also add in the Stock Cube if you're planning to use one. Top up with Water/Stock and pour in the Red Lentils. Let this come to a boil.

Turn the heat to medium low, cover the pan and let this go for 30-45 minutes, until the Dal gets cooked. Throw in the chopped Coriander leaves. Purée 75% of the ingredients to a smooth velvety goodness, while letting the remaining 25% be chunky, for a superb textural contrast. You'll thank me later!

Return the soup to the pan on a low heat, and add in the Coconut Milk. Give it 3-4 minutes, then season with Salt and a generous cracking of Pepper.

To Serve: Place a small handful of boiled/cooked Rice in each bowl, and top it up with Soup. Garnish with a dollop of Plain Yogurt. You can also add a squeeze of Lemon Juice. People also serve this 'best-soup-they've-ever-had' with pan fried/roasted Cashews or Almond slivers. I'm salivating already.

Note: You can make this recipe with Chicken as well (traditionally it is made with Chicken), in which case you will need 200 gm of Chicken sliced into cubes. Pan fry them before you start the Soup process, for 90 seconds on each side, and remove them. Continue with the Soup recipe as above. Throw the Chicken pieces in along with the Coconut Milk at a later stage and cook for 6 minutes instead of 3! I made mine with Chicken :)

Tuesday, December 9, 2014

Happy Anniversary Yauatcha!

December is the month that makes me the happiest, what with the Christmas cheer, the mornings with a nip in the air, playing Secret Santa, baking goodies, planning how to party on the new years eve while secretly analyzing my own growth over the entire year. I am looking forward to all those Christmas Special movie nights, watching Home Alone movie marathons, and all the other RomComs, from Serendipity to Sleepless in Seattle... I already have a smile on my face as I am typing this. This December began on a rather fantastic note, as I received an invitation from one of my favourite places to dine in, Yauatcha. Yauatcha is not the place that needs any feedback, but is nice enough to still ask people and actually give the suggestions an honest thought. The scrumptious food is only an added advantage. I have never really eaten an average tasting dish here, everything is cooked to utmost perfection.

From the 1st December 2014 to the 15th December 2014, Yauatcha is celebrating their 3rd anniversary, and celebrations include all-you-can-eat Dimsums and Wine between 3 PM and 7 PM. Along with that, they have also revamped their entire menu and I was lucky enough to give it a try!


The Yin Yang Dumplings were filled with three kinds of Mushrooms and were delicately cased together so they would melt in your mouth as soon as you put them in your mouth. We also tried Prawn and Seaweed Dumplings which were nothing short of exceptional.


The Charcoal Lamb Buns were light and steaming but one bite into them and I felt that depth of the tender lamb, which was so delicious that it made everyone at the table shut their eyes for a moment and savour the pure burst of flavour. This one is definitely going to be regularly ordered!


The Crispy Sugarcane Chicken and Prawn Roll was the most wow dish served to us, presented with a lot of personality in the form of biting into a sugarcane stick while chewing into the roll, just so that underneath the crisp exterior and the tender middle, there is a sweet and juicy hit, something you would never imagine to work on paper, but hey, my palate loved it!


The Crispy Prawn and Edamame Rolls were innovative and tasted like nothing I had ever tasted before. The dish is served with a sauce alongside, and you can choose to have the sauce poured over the rolls or eat them as is. I tried them both with and without the sauce and I prefer the sauced up moist and yet crunchy goodness!


The Stir Fried Pumpkin Prawns were pure genius. The Prawns are coated in a batter made out of puréed Pumpkin and fried till tender, and the Pumpkin batter makes them taste so good!


We next tried the Lamb in Kam Hyeong sauce. I have never had Lamb so tender in India. The curry was heavily spiced but was not overwhelmingly loaded with unnecessary spices at the same time. 


Yauatcha is one of the places where I feel that the Vegetarian selection does as much justice to the customers as the Non Vegetarian ones, if not more. The 4 style vegetables proved that yet again. We had them with the Chicken and Egg White Rice, in a bowl, with chopsticks, relishing every little morsel. 


I got to try the much talked about Raspberry Delice for dessert. I have to say this, it was not worth the hype. I agree that it is a pretty looking plate but it was too sweet for my liking. That being said, while it was not up to the Yauatcha standard, it still beat the many desserts I have eaten at random places. It was still yummy!


I also tried the Jasmine Tea Cake and I have only one word to describe it... WOW. The light and airy mousse cake came with a side of ice cream and the whole plate was like a marriage made in heaven. If I had to pick one dish to recommend from Yauatcha it would definitely be the Jasmine Tea Cake, and also the Pumpkin Prawns. 


I also tried the Macarons from the dessert display at the ground floor but I was not too excited about them, I guess my Macaron love probably lies in Delhi... Or maybe Paris!

Here's wishing Yauatcha a Happy Anniversary once again and thanking them for having us over! It is always a pleasure visiting you guys!


Saturday, May 31, 2014

Recipe: 'Finger Lickin' Good' Southern Fried Chicken.


I am not going to write an intro for this recipe- it does not need one. What you do need to know is that it is a 100% crowd pleasing recipe! I taught this one at a cooking class but I have been receiving too many requests for the recipe, so here it is!

Finger Lickin' Good Fried Chicken
Serves 6
Recipe: Self

Ingredients:

Marination:
1.5 kg Chicken, cut into big pieces. (12 pieces)
4 Cups Buttermilk
1 tbsp Red Chili Powder
1 tsp Pepper
Salt to Taste

Coating:
Panko Crumbs for coating (you can also use tough bread, or 'butter' that is available at khaari shops in India)
1/2 Cup All Purpose Flour
1/2 tsp Oregano
Canola/Sunflower Oil for Skillet Frying

Seasoning:
1 tbsp Caster Sugar
1/2 tsp Red Chili Powder
A pinch of Salt and Pepper.

Method:

Mix all ingredients for the marinade and add the Chicken to it, let it chill in the refrigerator overnight, covered. You cannot skip this step. The Buttermilk really does all the magic overnight. (giving it the omnomnomnomy feeling)

Heat 1 inch Oil in the frying pan. In a flat dish, mix the ingredients for the coating. Coat the chicken pieces thoroughly and let them rest for 10 minutes on a wire rack. In a separate dish mix ingredients for the seasoning and have them ready.

Fry the chicken pieces till tender, mine took around 12 minutes (6 minutes each side) to turn a lovely golden brown colour. Drain on paper towel and sprinkle the seasoning evenly on the Chicken pieces.

Serve them with Waffles and drizzle a lot of Syrup, or serve them as is!

(and thank me later)

P.S. They can be reheated in the oven at 150C for 5 minutes.


Saturday, December 21, 2013

5 Things : A new series! Sofitel, Mad Over Donuts, Hard Rock Cafe, Faasos and a Cheese Overload!

I've been meaning to start this for a while now.

5 things that make me smile : Mostly about Food. But you know me, I'll put up anything!

So here it goes!

1. Lunch Buffet at Sofitel, Bandra Kurla Complex:


Tried out the brunch at Pondicherry Cafe recently, and I must say they have a pretty awesome spread! While they also have a live Pizza, Pasta and Noodle table, there are innumerable amounts of options and one could spend a leisurely time while enjoying sumptuous food! Special mention for the amazing Sushi counter and the Cold Cut and Fish station!

Saturday, October 27, 2012

Honey Glazed Sesame Chicken. A 'Shop For Change' initiative.


Last month I received a hamper from Shop For Change India who work towards empowering the Farmers and make sure that everything is Fair Trade. Fair trade is a market led solution to poverty which aims to use trade, not aid, to improve livelihoods for disadvantaged farmers and artisans and promote sustainability. You guys should definitely visit their website and check out the awesome initiative taken towards the betterment of the lesser fortunate.

Monday, September 17, 2012

Butter Lovers Rejoice! Herb Butter and Green Garlic Butter.


Just in my last post I spoke about the complexity of simplicity. I think this spread is a perfect example of it. Just plain, softened butter, serenaded with Herbs, or alternatively finely ground Green Garlic and Parsley. I don't think this even needs a recipe! But I will try.


Tuesday, October 11, 2011

Craving for Guilt Free Snacks? Papdi Chaat is the answer for you.


For anyone (and I'd bet that there aren't many) who has been following my blog since it started, would know that I get these major Food Cravings, and that they are so specific at times that it's kinda hard. This is one reason why I started cooking in the first place. Coz I at least had access to the ingredients if not the final product. Last night I was craving for this yummy snack packed with flavor that tastes so fresh and never fails to impress. My food memory with this dish is a shop named Super Sweets, where I used to have this dish almost every week. Sadly, the shop closed down but my food craving was so specific that I only wanted the Papdi Chaat from Super Sweets. So, here's my take on the famous Super Sweets Papdi Chaat.

Papdi Chaat
Serves 4-5

Ingredients :
 250 gm ready made Papdi/Puri, or you could also make it
250 gm Nylon Sev
1 Large Onion, finely chopped
2 Large Tomatoes, finely chopped
2 Large Potatoes, Boiled and roughly chopped/mashed. Sprinkle lightly with chaat masala and salt.
½ cup Boondi, soaked in water (optional)
1 cup boiled sprouts of choice (optional)
4 teaspoons Red Chili powder
4 teaspoons Roasted Cumin Powder (roast cumin seeds on a hot pan and grind them to a powder)
6 teaspoons Chaat Masala
Salt to taste
1 ½ cups Thick Yogurt
1 teaspoon Sugar
½ cup Cold Water

For the Sweet Chutney:
 8-10 de-seeded dates soaked in warm water for 30 minutes.
An inch of Tamarind soaked in warm water for 30 minutes.
2 inches of Jaggery (cut into small pieces)/4 tablespoons Sugar
1 teaspoon Oil
2 teaspoons Sugar (Omit if not using jaggery)
A pinch of Asafoetida
½ teaspoon Cumin Seeds
½ teaspoon Red Chili Powder
A pinch of Salt

 For the Green Spicy Chutney:
 2 cups Coriander (Leaves, stalk, roots et all. Just nicely wash them)
1 cup Mint leaves.
1 Small Onion, roughly cut
3 Small Green Chilies
2 tablespoons Lemon Juice
½ teaspoon Salt
1 teaspoon Sugar
¼ cup Water.

Note : You can buy the Green chutney and the Sweet chutney readymade from stores :) Also, for people who cannot get their hands on Papdi, I would recommend using any thin savory flaky biscuits!


Method:

For the Sweet Chutney : Grind the dates and the de seeded Tamarind with some water to make a thin paste (You could also use a tablespoon of Tamarind paste instead of the soaked Tamarind). Reserve the residual water in which the dates and the tamarind has been soaking. Strain if needed. In a small pan heat up the Oil and add the Cumin seeds, followed by the Asafoetida and the Red Chili powder. Then pour in the date and tamarind mixture, and add in the jaggery, sugar and salt. Mix till the jaggery dissolves, taste and adjust if you need any more sweetness. Let the chutney cool in the refrigerator.


For the Green Chutney : Add all ingredients to the grinder and process it well. That easy.


Assembling the Papdi Chaat: Whisk the Yogurt with the ½ cup Water and Sugar. Set aside.


In your dish, (I suggest using a dish with rims on the side or a flat bowl. You could make this in one large bowl and serve it family style or break it up in to 4-5 individual portions.) break the Papdis.


Add in your Potatoes, Onions and Tomatoes. I like extra Tomatoes! You could also add in your boiled sprouts here. I did not get my hands on them so I skipped them.


Now add in your soaked boondi, Green Chutney and Sweet Chutney, just putting them by the spoon around the whole assembly.Sprinkle some Red Chili Powder, Cumin Powder, Chaat Masala and a little Salt.


Now pour that lusciously silky Yogurt mixture over the top. Yum.


Sprinkle a nice thick layer of Sev, followed by some more sprinklins of Red Chili Powder, Cumin Powder, Chaat Masala and Salt. Garnish with Chopped Coriander and some more Chopped Tomato.


Ideally I let it sit in the refrigerator for about 15 minutes but you can dig right into it if all your ingredients are cold :) Or even if they aren’t, it’s safe to have this one right away! I made a huge second portion in a dabba which got over soon enough :|


Wednesday, July 27, 2011

Faux Keema (Minced Meat) Burgers.


I am posting here after AGES! And I have no excuse at all, I have been really putting it on the backburner for a long time and now I have so many posts that I need to type! I hope every one has been doing fine :) Now, without further ado, here I go...

I made these Soya Granules Burgers today and they turned out so delicious, I just knew I had to put them up here as soon as possible. Just calling them Faux Meat Burgers to sound fancy ;)


Faux Minced Meat Burgers/ Soya Granules Burgers
Serves 4-5

Ingredients:

1 cup Soybean Granules
1 Medium Onion, Finely Chopped
1 teaspoon Ginger-Garlic Paste
4 slices of Bread
1 tablespoon Red Chili Powder
2 tablespoons Coriander Powder
1 tablespoon Garam Masala Powder
1 teaspoon Chaat Masala Powder
A handful of Chopped Coriander Leaves/Cilantro Leaves
Mustard Sauce to taste
Ketchup to taste
Dark Soy to taste
Salt to taste
Pepper to taste
Oil
Water
Burger Buns
1 Tomato, thinly sliced into roundels

Method

Boil the Soya Granules in 3 cups of water with a dash of Soy sauce. Then drain them and set aside. In a pan, heat up 1 tablespoon Oil and add in the Onions, sauté them till translucent.Then add in the Ginger-Garlic paste and fry for a minute. Turn the heat to medium low, and add in the Soya Granules followed by Red Chili Powder, Coriander Powder, Garam Masala Powder. Mix well, add Salt and Pepper. Transfer this to a flat dish and let it cool.
Once cool, add in 4 slices of bread, soaked in water and squeezed, the Coriander Leaves, a dash of Mustard and Ketchup each, and Chaat Masala Powder. Knead this into a  dough and form patties. I made 12. Then fry them on medium low on a pan lightly coated with Oil. I did them 4 at a time, 3 minutes each side. They don't break unless you add a lot of pressure, so there is nothing to worry.


Now toast your buns and assemble your burgers, a half of the bun, followed by the patty, then a slice of Tomato, a dash of Mustard and Ketchup if needed, and top it off with the other half of the bun. No rocket science here! :P And ENJOY!


Thursday, February 17, 2011

Homemade Hummus (It's healthy but I tried to make it healthier) ♥


I love that I have started eating healthy and the fact that I have to update the blog and also that I can get bored of eating the same stuff daily, makes me want to try out healthy alternatives to the foods I love to eat. Hummus is one of my favorite things, mainly coz it is rich in Manganese and is very very healthy, not to forget extremely tasty. I saw a recipe online the other day and I knew I had to try it. So here it goes :)

Homemade Hummus - The Healthier Version. Recipe from here, and the Tahini recipe is from here if you want to try it out. But I just combined the two. You can also just use store bought Tahini instead. But I'd suggest you try the fresh version. You can also substitute Tahini with 2 tablespoons of Peanut Butter. Makes a huge jar full of Hummus.

Ingredients:

4 cups canned Chickpeas, But I suggest using fresh so 1 cup of raw uncooked Chickpeas.
1 tablespoon Baking Soda
1/2 cup Sesame Seeds
1/2 cup Olive Oil (combined for Tahini + Hummus)
2 large cloves of Garlic
Juice of 1 Lemon
1 teaspoon Cumin Seeds (I used my Roasted Cumin Powder)
Salt, Sugar to taste
Parsley
A sprinkle of Paprika or Cayenne Pepper Powder.


Method:

Soak the Chickpeas in water overnight with 1/2 tablespoon Baking Soda. In the morning, change the water and let them soak for 5 more hours. Changing the water frequently actually makes you less gassy as per the recipe. Then cook them for 90 minutes on medium low with the rest of the Baking Powder and water, till they become soft enough that they mash up when you press them between your fingers. If you're using canned Chickpeas, you just need to get to the boiling part directly. I actually pressure cooked my Chickpeas for 10 minutes on high and they were pretty much done.
By this time, the skins of the Chickpeas were floating on top of the water and some of them were resting above the Chickpeas in the water. You need to remove them, if you can. No pressure here. But do make sure that you thoroughly wash them, even if they are mushy, coz you do not want to feel gassy later. Before you wash them, save 1 cup of the boiling water for back up. You need to get rid of all the froth and scum from the Chickpeas.

While my Chickpeas were in the pressure cooker, I just quickly dry roasted the Sesame seeds. Now you need to miss this paragraph if you already have Tahini at home, or are using Peanut Butter instead. But Tahini is basically just dry roasted Sesame Seeds blended with Olive Oil till they become a soft pourable paste. So I let the dry roasted Sesame Seeds cool a bit.
Next, in a blender I blended together the Sesame seeds (not to be used if you are using Tahini/Peanut Butter, in which case you just add the 2 tablespoons of Tahini/Peanut Butter instead of the Sesame Seeds), Garlic, Cumin, Lemon, Salt, Sugar (Optional) and threw in some Chickpeas too, and added some oil. Blended them really fine into a paste, and repeated it for all the Chickpeas and consumed the whole 1/2 cup of Olive Oil stage by stage. If you have a big enough blender though, just throw everything together and blitz. You need to have a consistency little bit thinner than what you desire, and if it gets too thick, feel free to add the cooking water from Chickpeas at this stage. Voila! You're done. This Hummus is amazingly light and delicious, decorate it with a good drizzle of Olive Oil and sprinkle Cayenne Pepper on top. Sprinkle chopped Parsley too, but I did not have it at the moment so I just decorated it with a tiny sprig of Cilantro/Coriander.
It stores quite well! Use it as a dip with your Pita Bread, or in a Chicken Salad, or as a dip with vegetables which is my favorite way to consume them these days. Dipped in Hummus! I really recommend this recipe!

Sunday, January 23, 2011

Tasty and Healthy Cumin Crusted Cutlets with CoCoMi Chutney.


I have been a little busy this week, and did not cook a lot, but I make this all the time and every time I make them, I try and make them healthier!

Cumin Crusted Cutlets with CoCoMi Chutney
Recipe by : Self
Serves 4 as an appetizer

Ingredients:

For the Cumin Crusted Cutlets:
1 large potato, boiled and mashed. (You can use 2 small)
1 cup Soyabean Granules (You can also use minced meat, in which case you will need to add 1 whisked egg to the mixture too)
2 tablespoons Dark Soy Sauce
1 tsp Red Chili Powder (Or 2 chopped Green Chilies)
1 tsp Dry Coriander Powder (Optional)
1 tsp Chaat Masala Powder (Optional)
1 tsp Aamchur (Dry Mango) Powder (Optional)
Seeds of Half a Pomegranate. (This is purely seasonal)
A handful of finely chopped Cilantro/Coriander (You can also add in some Mint)
3 tablespoons Cumin Seeds, Roasted over a dry pan
5 slices of Multi Grain/ Whole Wheat Bread
Cooking Spray / Oil for greasing
Salt to taste

For the CoCoMi Chutney:

1 handful of Coriander leaves
1 handful of Mint leaves
1 Chili (Optional)
Juice of 1 Lemon
An inch of Ginger
2 large cloves of Garlic
Salt and Sugar to taste
1/2 cup Coconut Milk


Method:

Heat the oven to 400F/190C (If you plan on baking these)

For the CoCoMi Chutney:

Add all Ingredients in the blender except the Coconut Milk,Sugar and Salt. Blend on high till it forms a smooth paste. Now add the Coconut Milk and blitz again. Then add Salt and Sugar as per taste. Chill in the refrigerator till your Cutlets get ready!

For the Cumin Crusted Cutlets:

Roast the Cumin on a small dry pan on high heat, till it gives out the aroma. Remove it on a plate and let it cool down. Crumb your bread slices, and before you remove them from the blender, add the Roasted Cumin and blend again. You will have a beautiful, strong aroma in the room. Spread them over a plate. In another bowl, mix all the other ingredients, and knead them together so it forms a dough. You can add half cup of your processed bread crumbs if you think the mixture dough is too loose to make cutlets out of them. But you should be fine. Chilling the mixture for 30 minutes also works if the consistency is loose.Form small, flat cutlets and cover them on both sides with the cumin crumbs. I got 16.

In case you're baking them (the healthier way), Grease a cookie sheet with some Pam or with Oil, and lay them side by side, bake them 15-20 minutes, till you get a beautiful crust on top.


I pan fried my cutlets on the griddle, with a total of 2 tablespoon oil (Just few drops to drizzle around the cutlets, which I fried 4 at a time) , 5 minutes each side on a medium flame, and got a beautiful crust on both sides. Serve with the smooth, minty CoCoMi Chutney! Enjoy :)
Older Posts Home

LinkWithin